
Auto-Off Timeclock
According to some building energy codes, commercial spaces that don’t have vacancy sensors must automatically turn their lights off outside of normal business hours. You can do this by creating an auto-off timeclock show in the Shows tab.
Note: The groups you intend to turn off must be controlled by at least one keypad.
Will my keypad still respond to touch control after-hours? Yes. Users coming in after-hours will be able to press any button on the keypad to turn on the lights. (This is referred to as a manual override; some codes require it.)
To set up an auto-off timeclock, follow these steps:
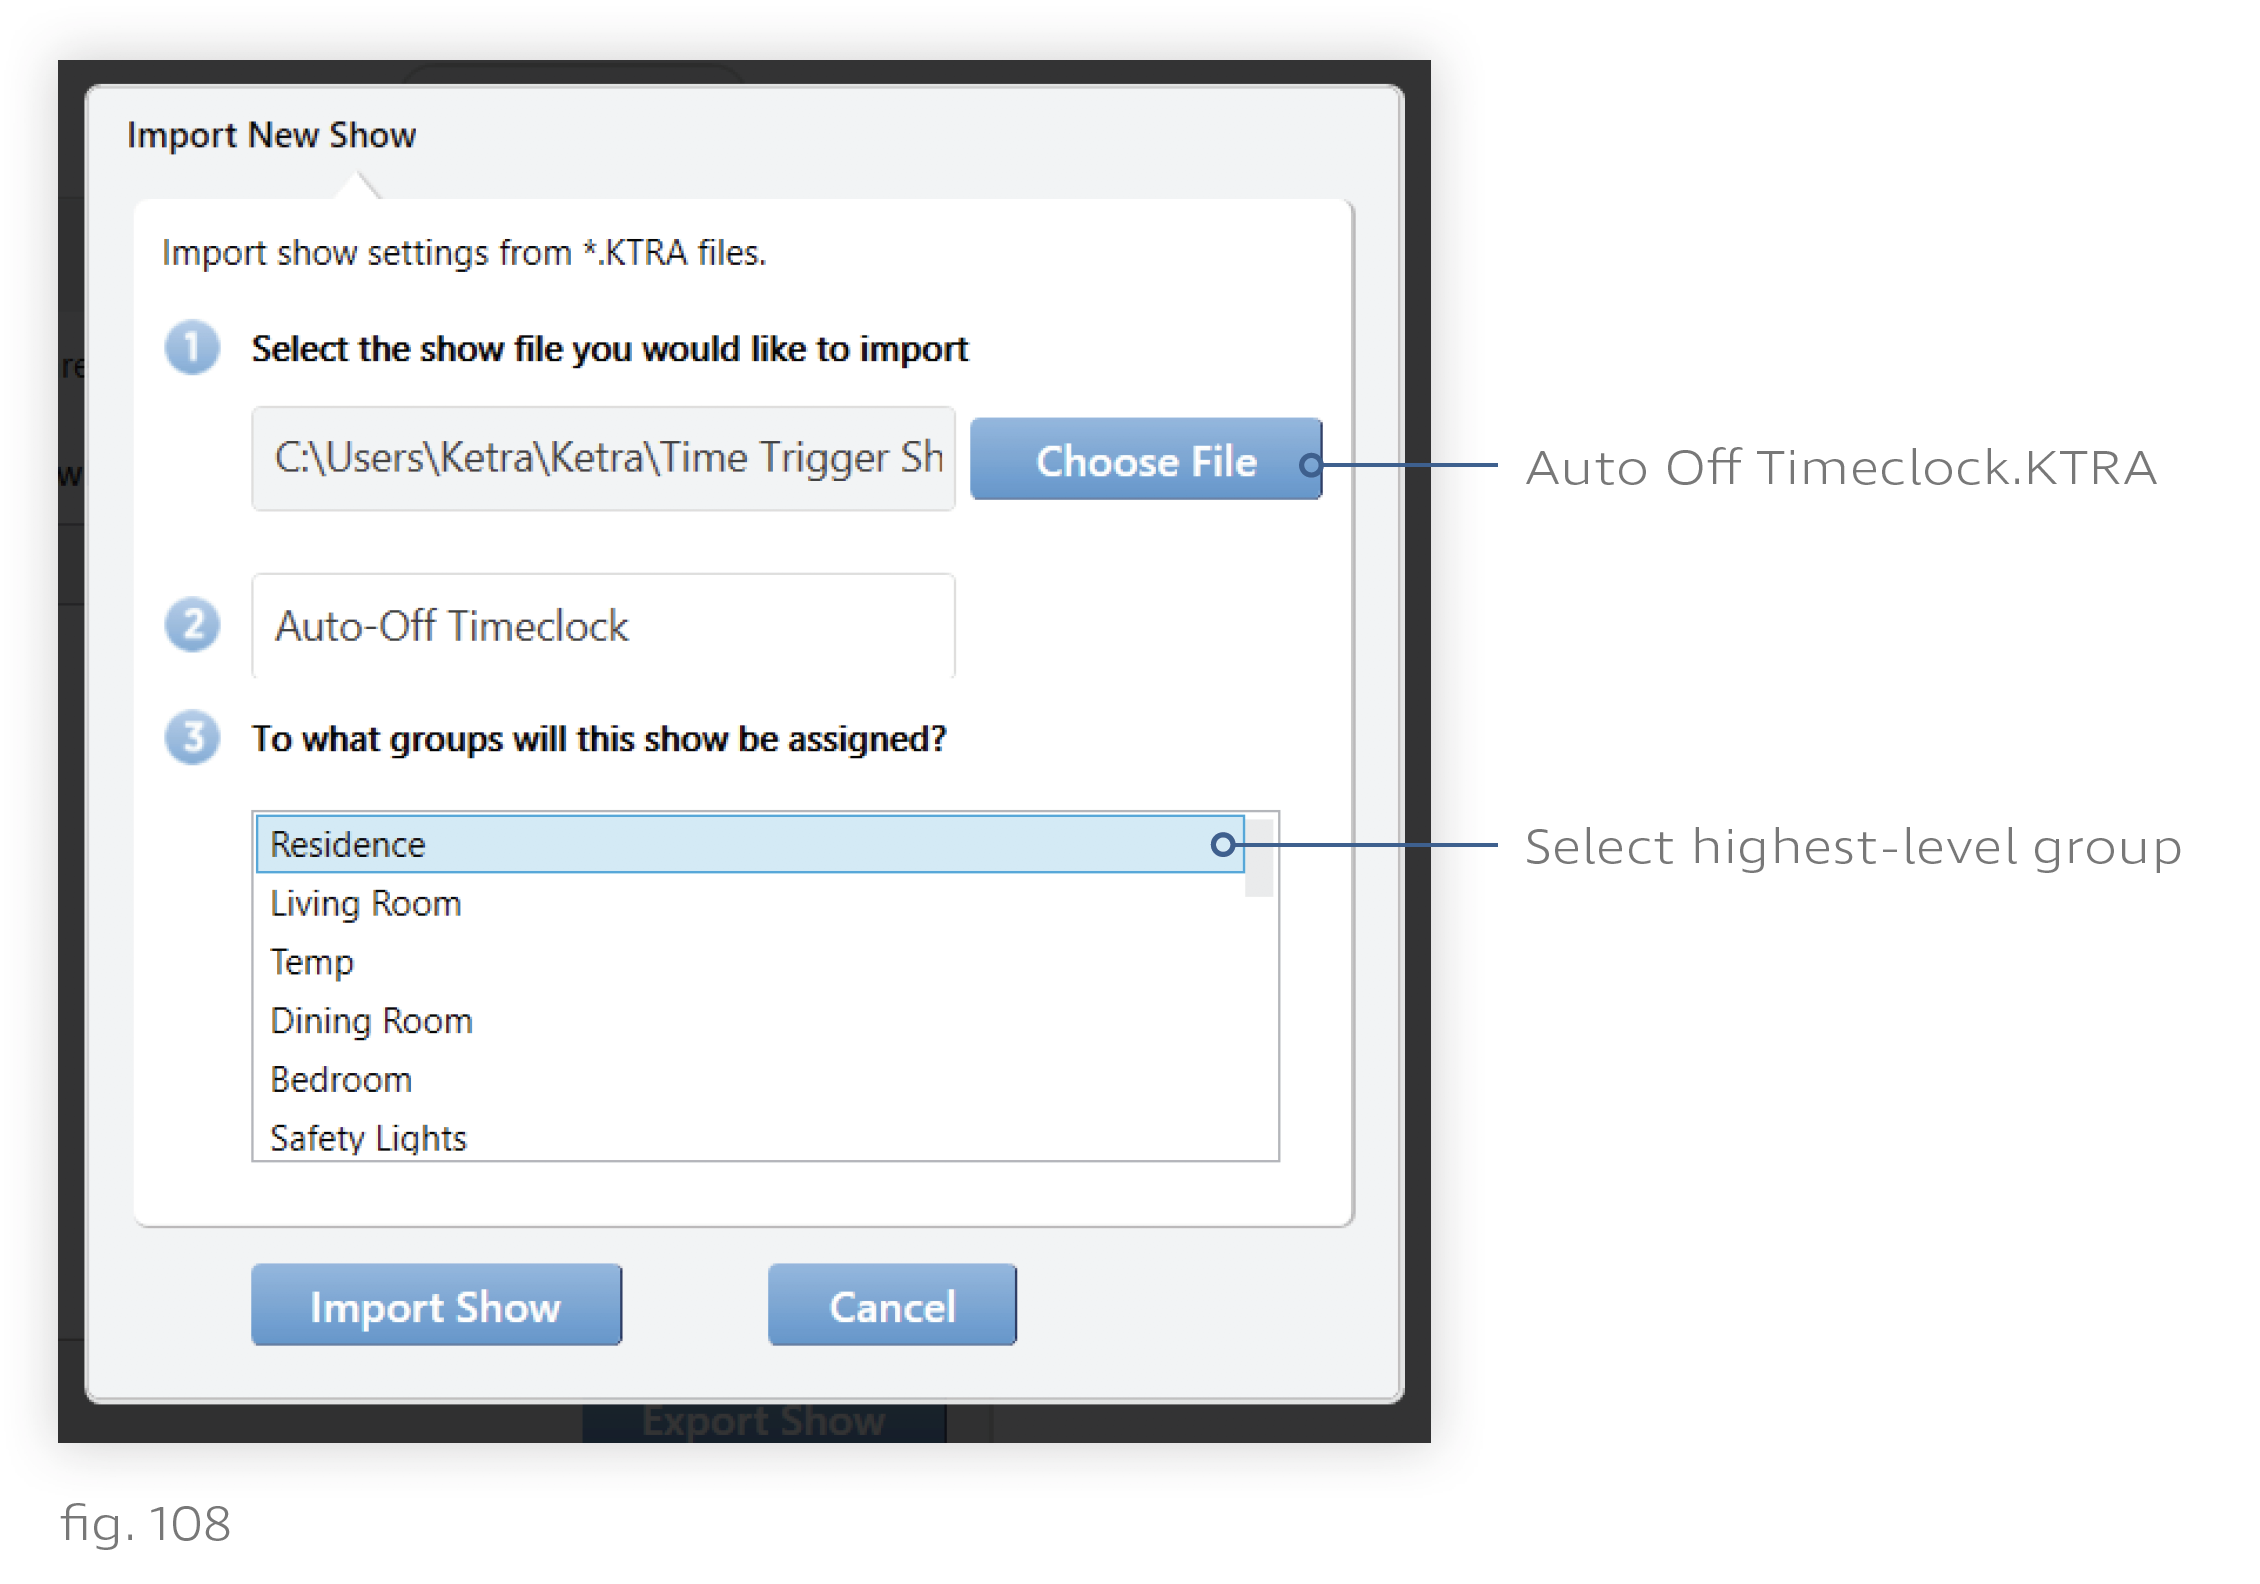
1. Click Import Show at bottom-left.
2. In the dialogue box, select the file Auto Off Timeclock.KTRA.
3. Name the show.
4. Select the highest-level group in the installation. This group will be the first in the list and will likely be named "Installation" or "Office".
5. Click Import Show.
6. In the upper-right, click Publish and Save.
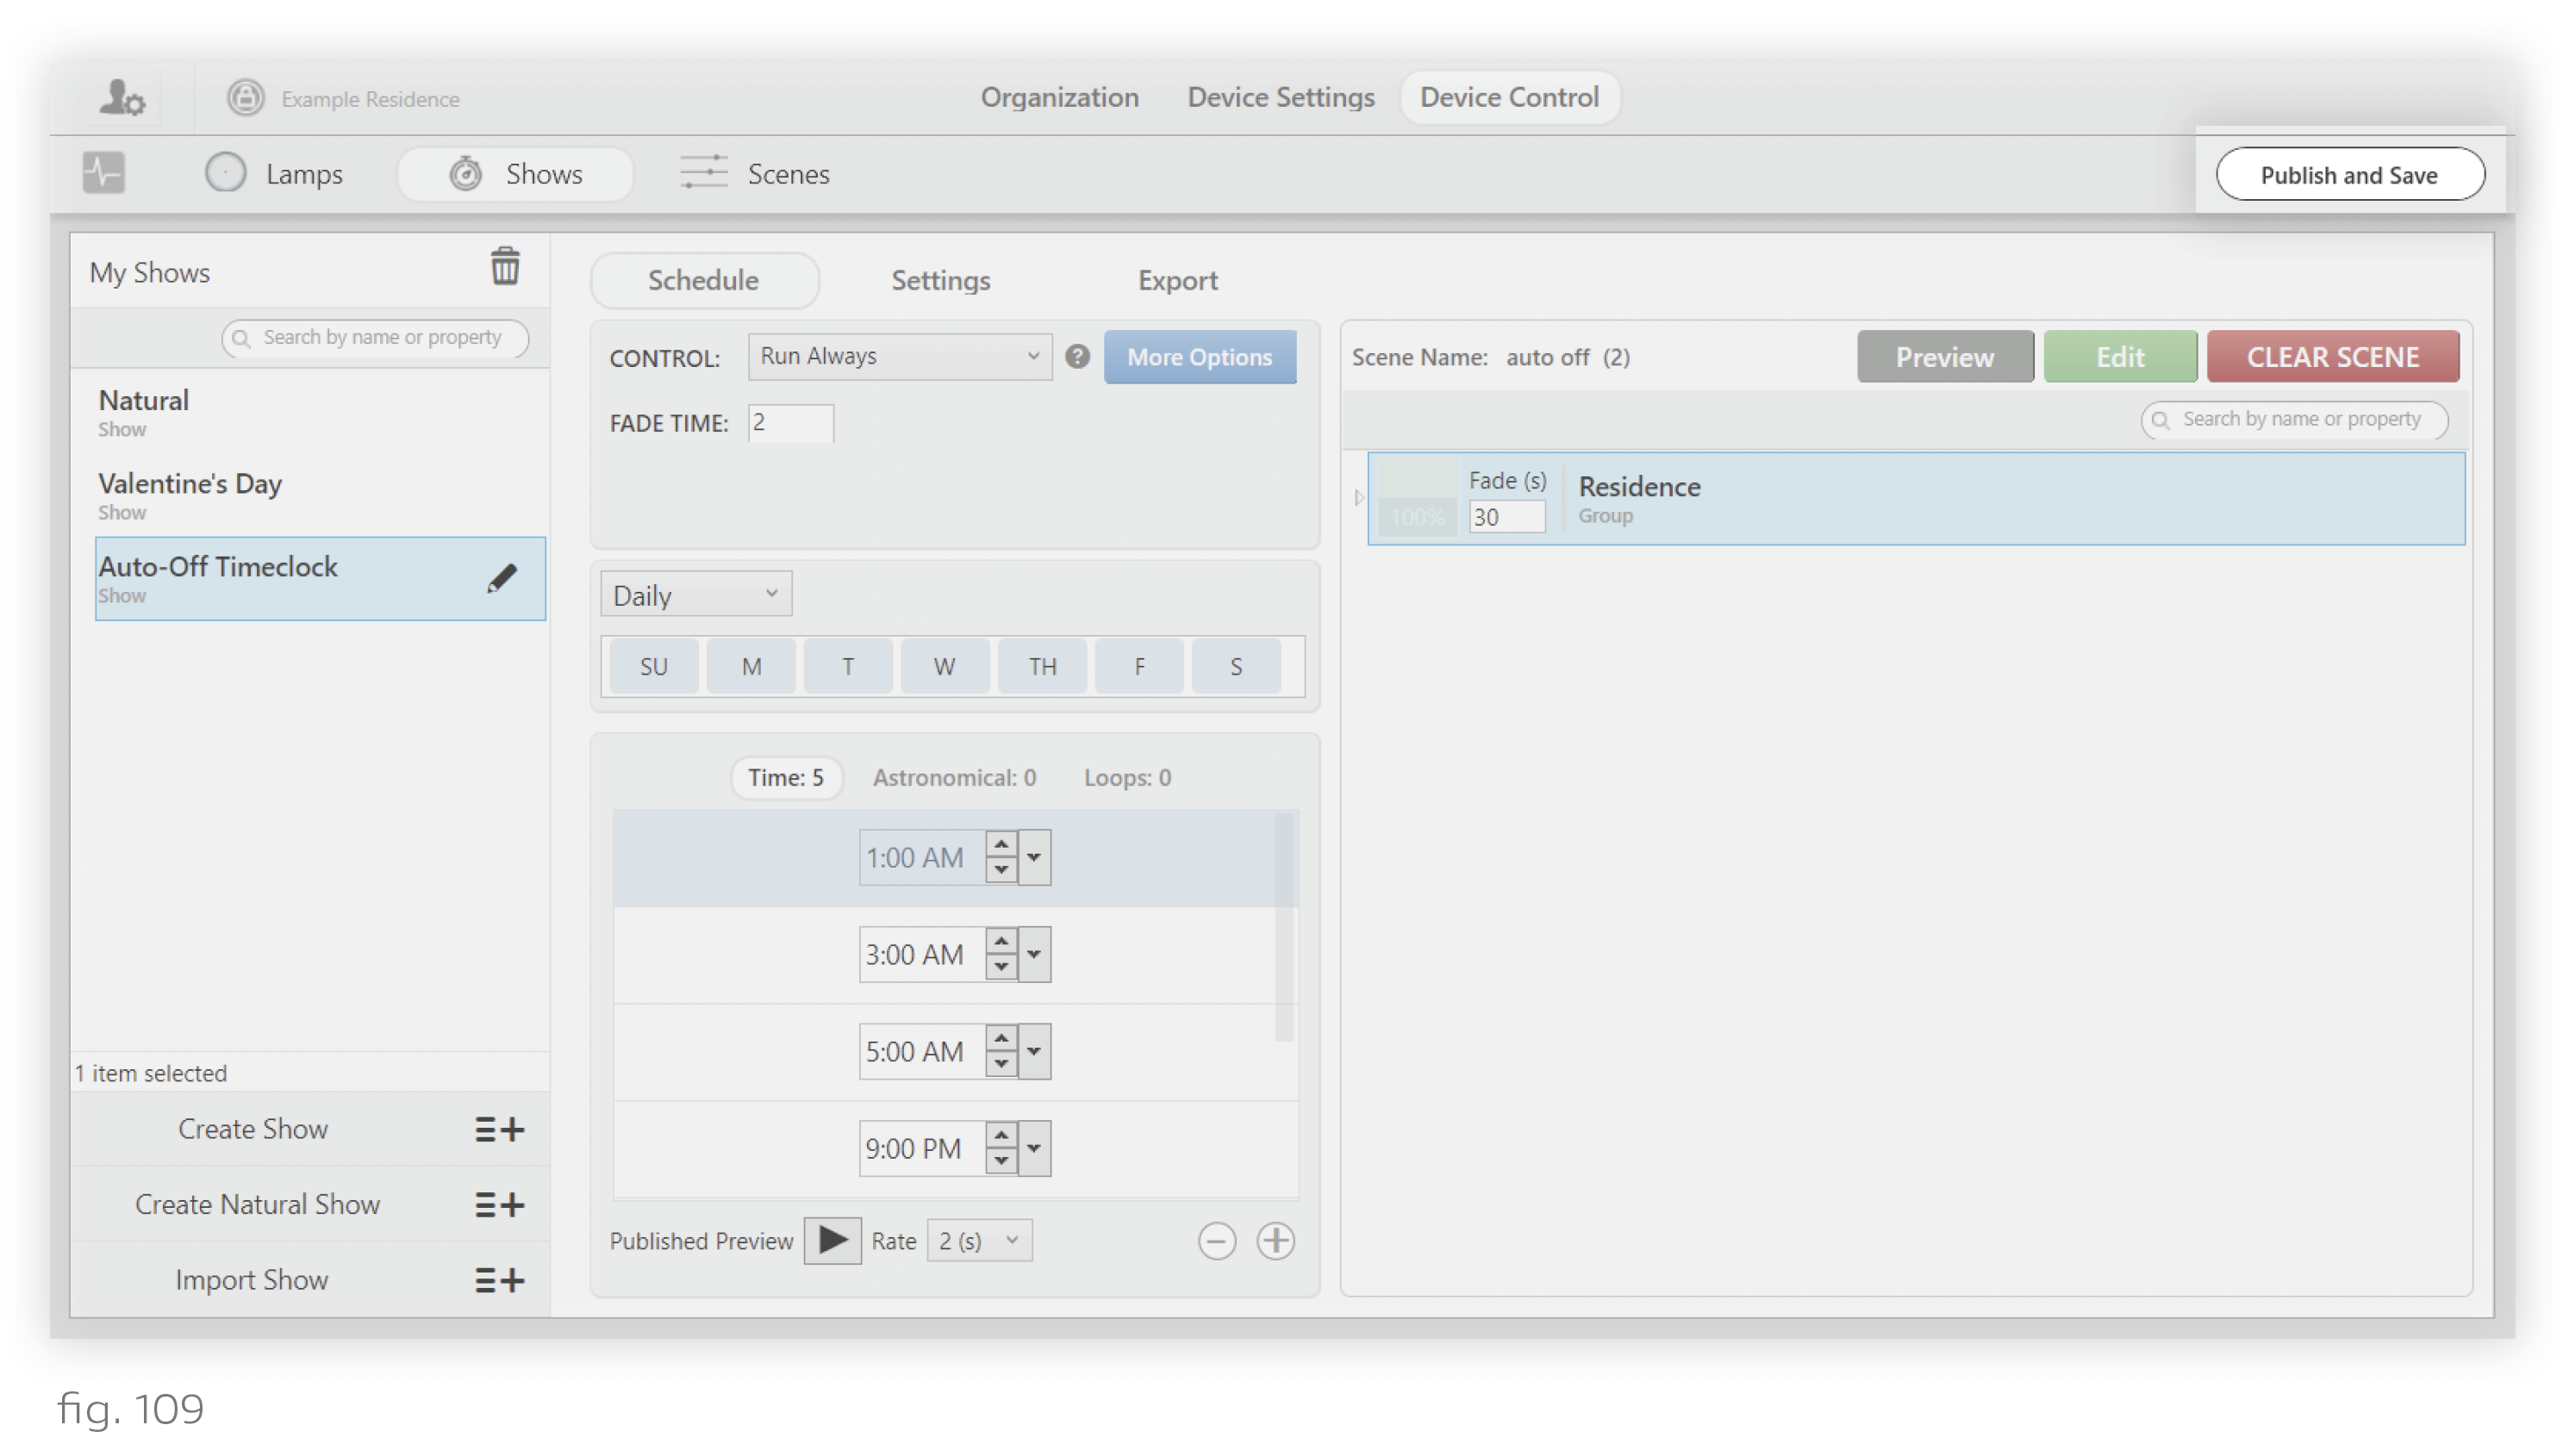
You now have a working auto-off timeclock show.
- At 9 PM, the auto-off show will turn off every group in the installation.
- A user can manually override the show by pressing a button on any keypad.
- Every two hours, the auto-off show will confirm that the lights are still off. If it finds the lights on, it will turn them off.
Note: Even if a user manually overrides the show at 10:59 PM, the show will turn the lights back off at 11 PM. In that case, the user can just manually override again and the lights will stay on for two hours.
At opening time, a user can press any button on the keypad to turn on the lights.
Automated Open/Close Time
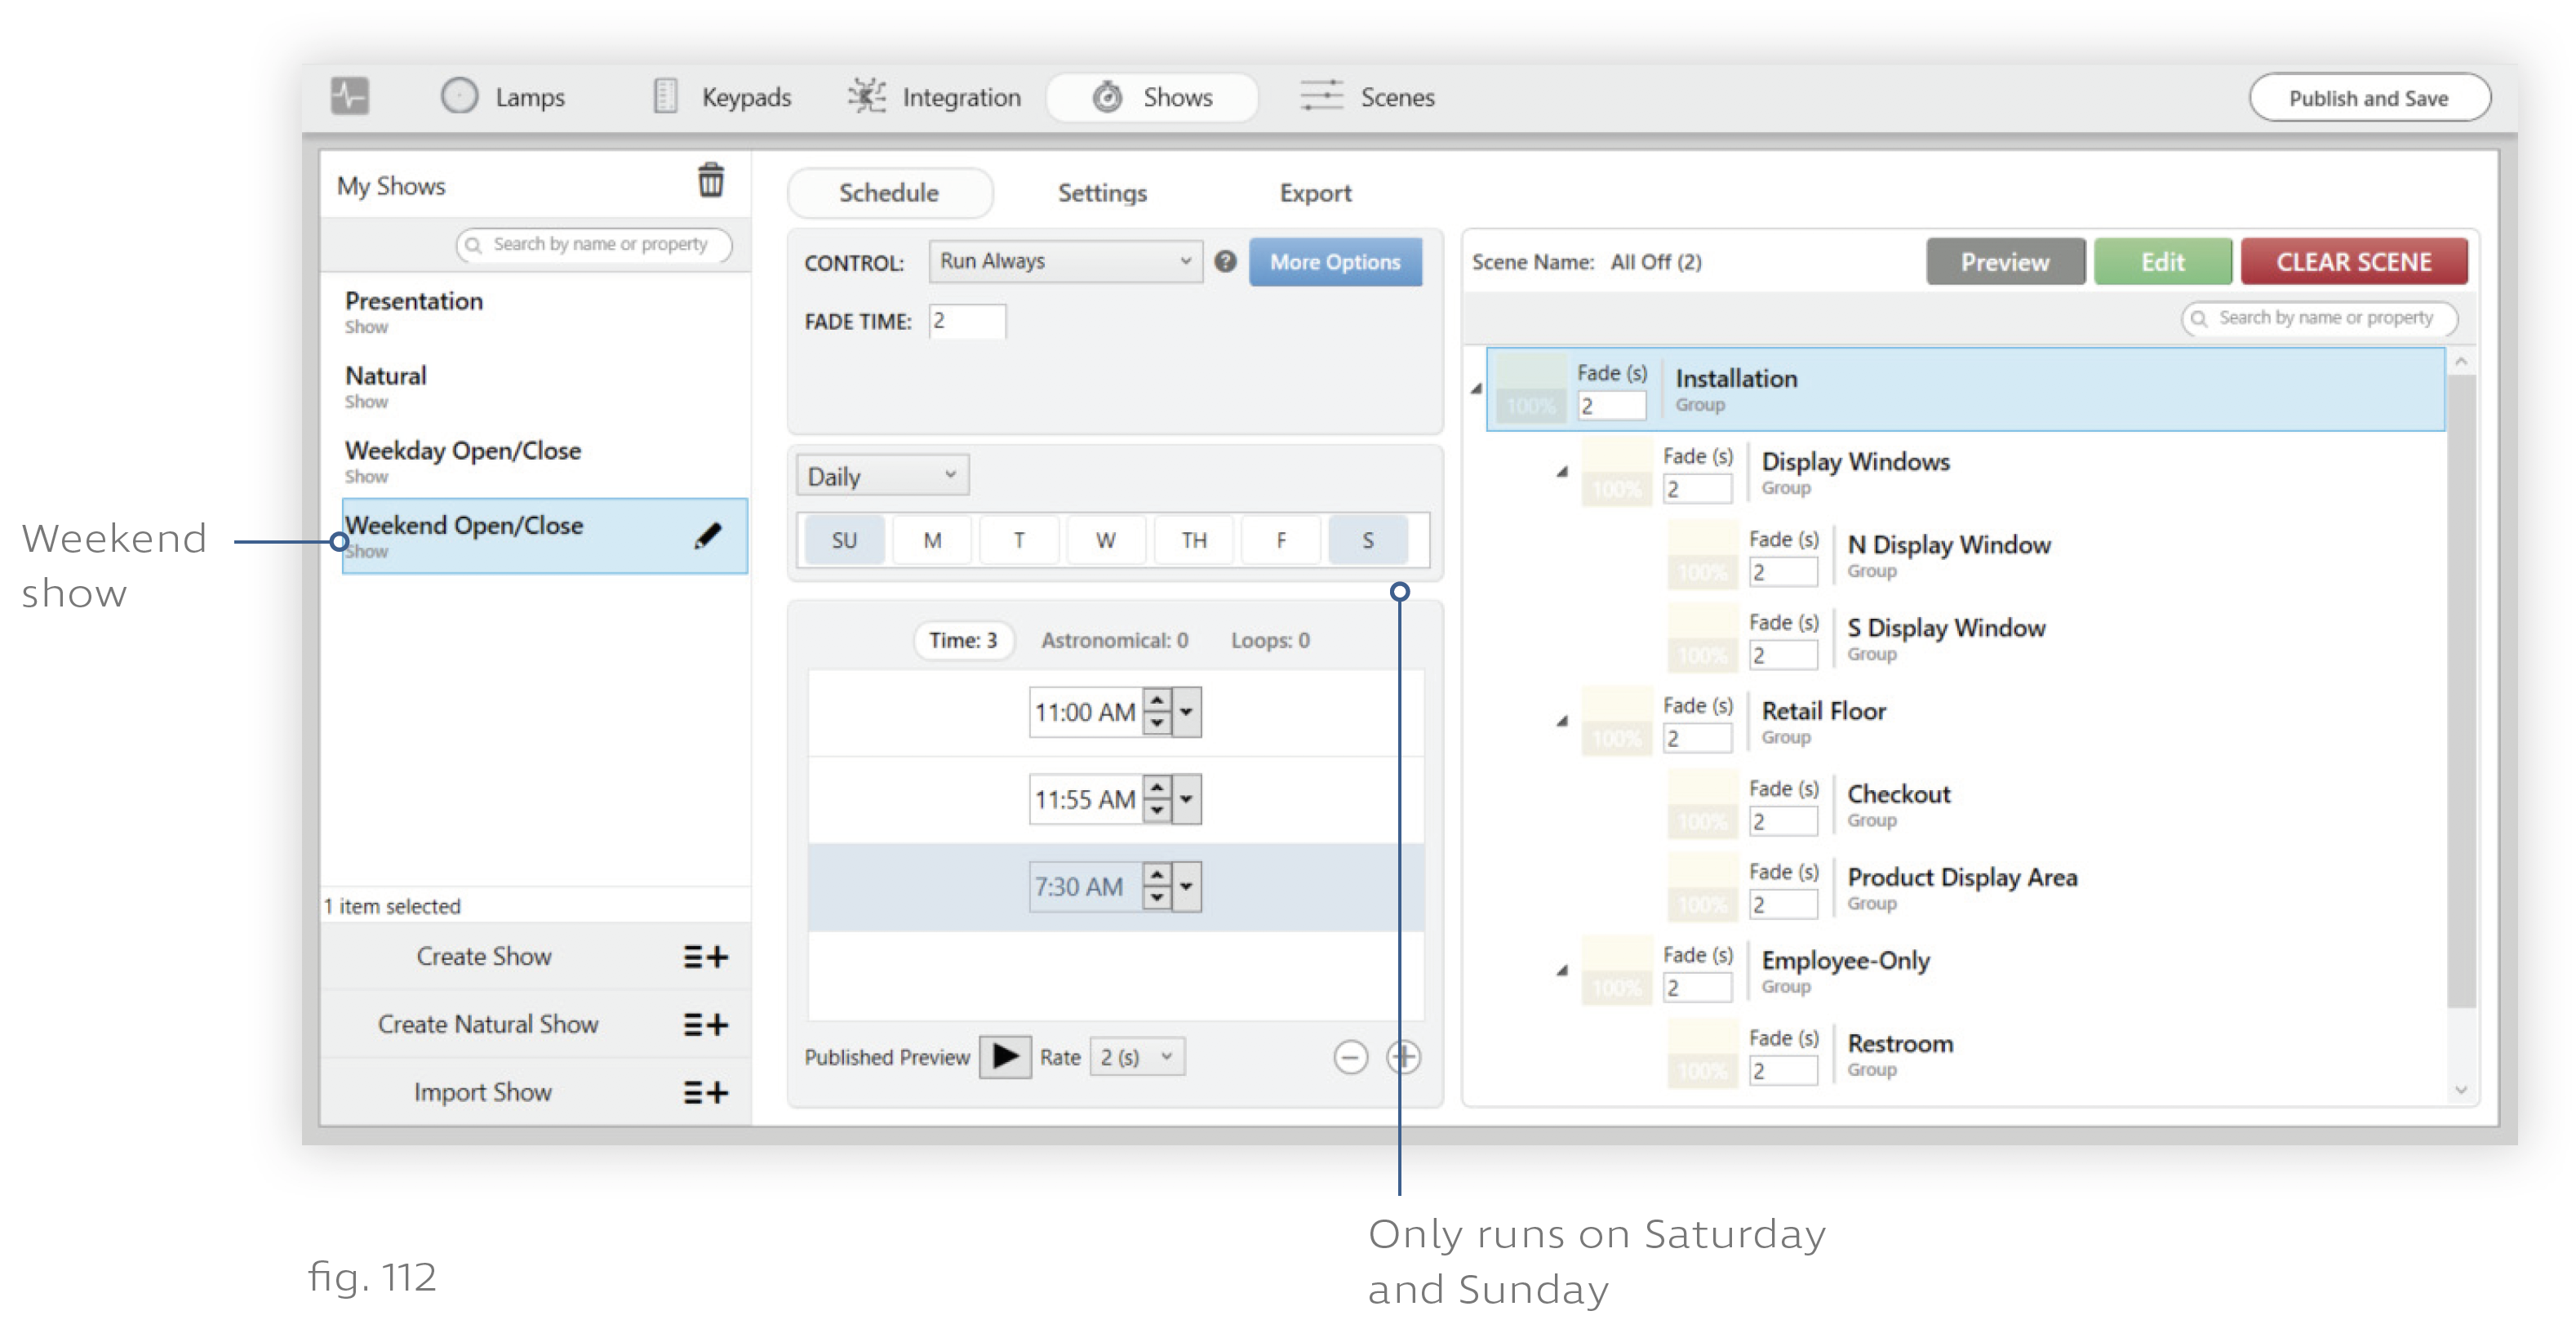
In this tutorial, we’ll imagine a business that is open 7 days a week. On weekdays, it is open from 10 AM to 9 PM. On Saturday and Sunday, it is open from 12 PM to 6 PM. To automate open and close times for this business, we will build two shows—one for weekdays, and one for weekends.
The weekday show will:
- Run automatically Monday through Friday
- Turn all lights on at 8:00 AM (1 hour prior to opening)
- Trigger a user-defined Retail scene at 8:55 AM (5 minutes prior to opening)
- Turn all lights off at 10:30 PM (1.5 hours after closing)
Note: For the purposes of this tutorial, we’ll assume that the Retail scene has already been built on the Scenes tab.
The weekend show will:
- Run automatically Saturday and Sunday
- Turn all lights on at 11:00 AM (1 hour prior to opening)
- Trigger a user-defined Retail scene at 11:55 AM (5 minutes prior to opening)
- Turn all lights off at 7:30 PM (1.5 hours after closing)
To configure the weekday show, follow these steps:
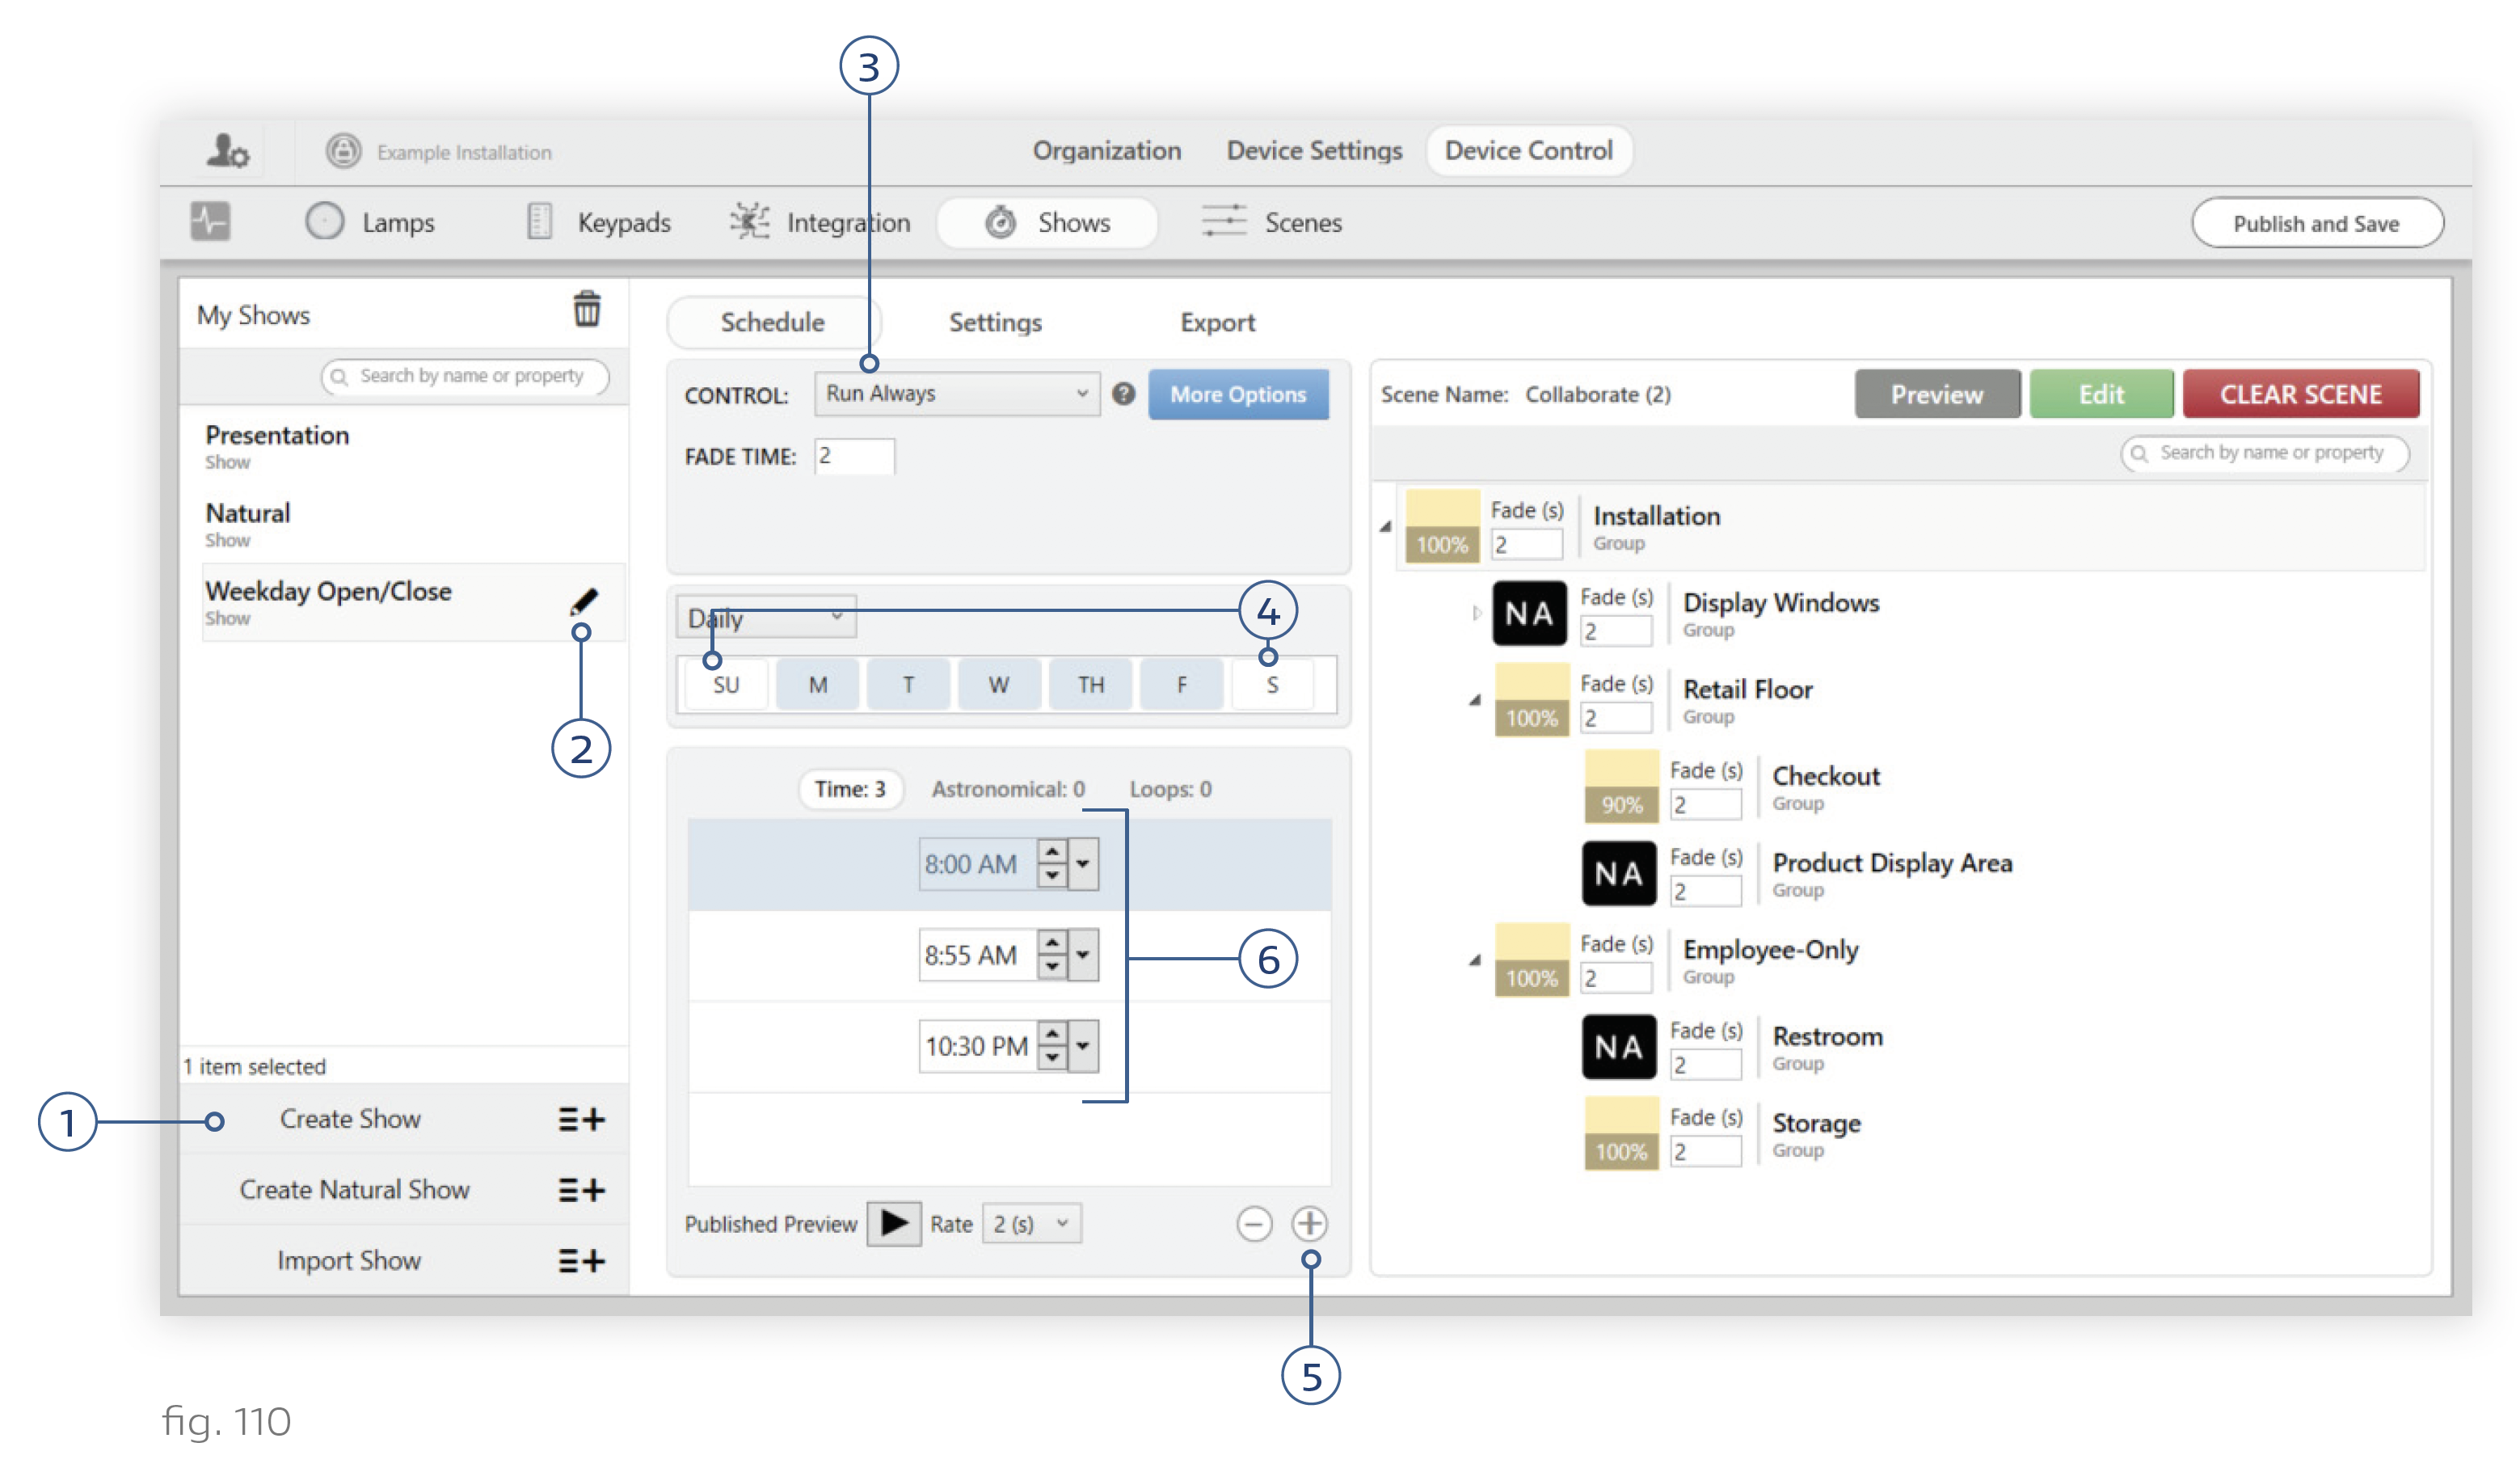
1. Create a new show. You can do so by clicking Create Show at the bottom of the My Shows panel.
2. Rename the show something like “Weekday Open/Close.” To rename a show, highlight it in the My Shows list and click the pencil icon.
3. Set the Control dropdown to "Run Always".
4. To make sure the show only runs on weekdays, deselect Saturday and Sunday in the run frequency pane. When deselected, the S and SU buttons will turn white instead of blue.
5. In the triggers list, add 3 triggers on the Time tab by clicking the + button. We will program one trigger to turn all lights on, another to set lights to the Retail scene, and the last to turn all lights off.
6. Set times for the triggers. In our example, the times are 8:00 AM (1 hour before opening), 8:55 AM (5 minutes before opening), and 10:30 PM (1.5 hours after closing).
7. Make a copy of a generic On scene for the first trigger. Since this trigger will just turn all lights on, we recommend making a copy of the Collaborate or Daytime scene. This will set every light in the installation to a warm white at 100% intensity.
Note: To exclude some groups from the trigger, click the green Edit button to open the Ketra Scene Builder window, then set the groups to NA by highlighting them and clicking the X button. Note that this method of excluding groups from triggers only applies to shows that run automatically. If you intend to link the show to a keypad button or analog input, do not use NA. For more information, see Excluding Groups from Shows.
8. Make a copy of the Retail scene for the second trigger.
Note: For the purposes of this tutorial, we’ll assume that the Retail scene has already been built on the Scenes tab.
9. Create a new scene for the third trigger. Name the scene something like “All Off.”
10. In the Ketra Scene Builder window, set the highest-level group to Off. To do so, highlight the group and click the power button in the top-right corner of the window (next to the intensity slider).
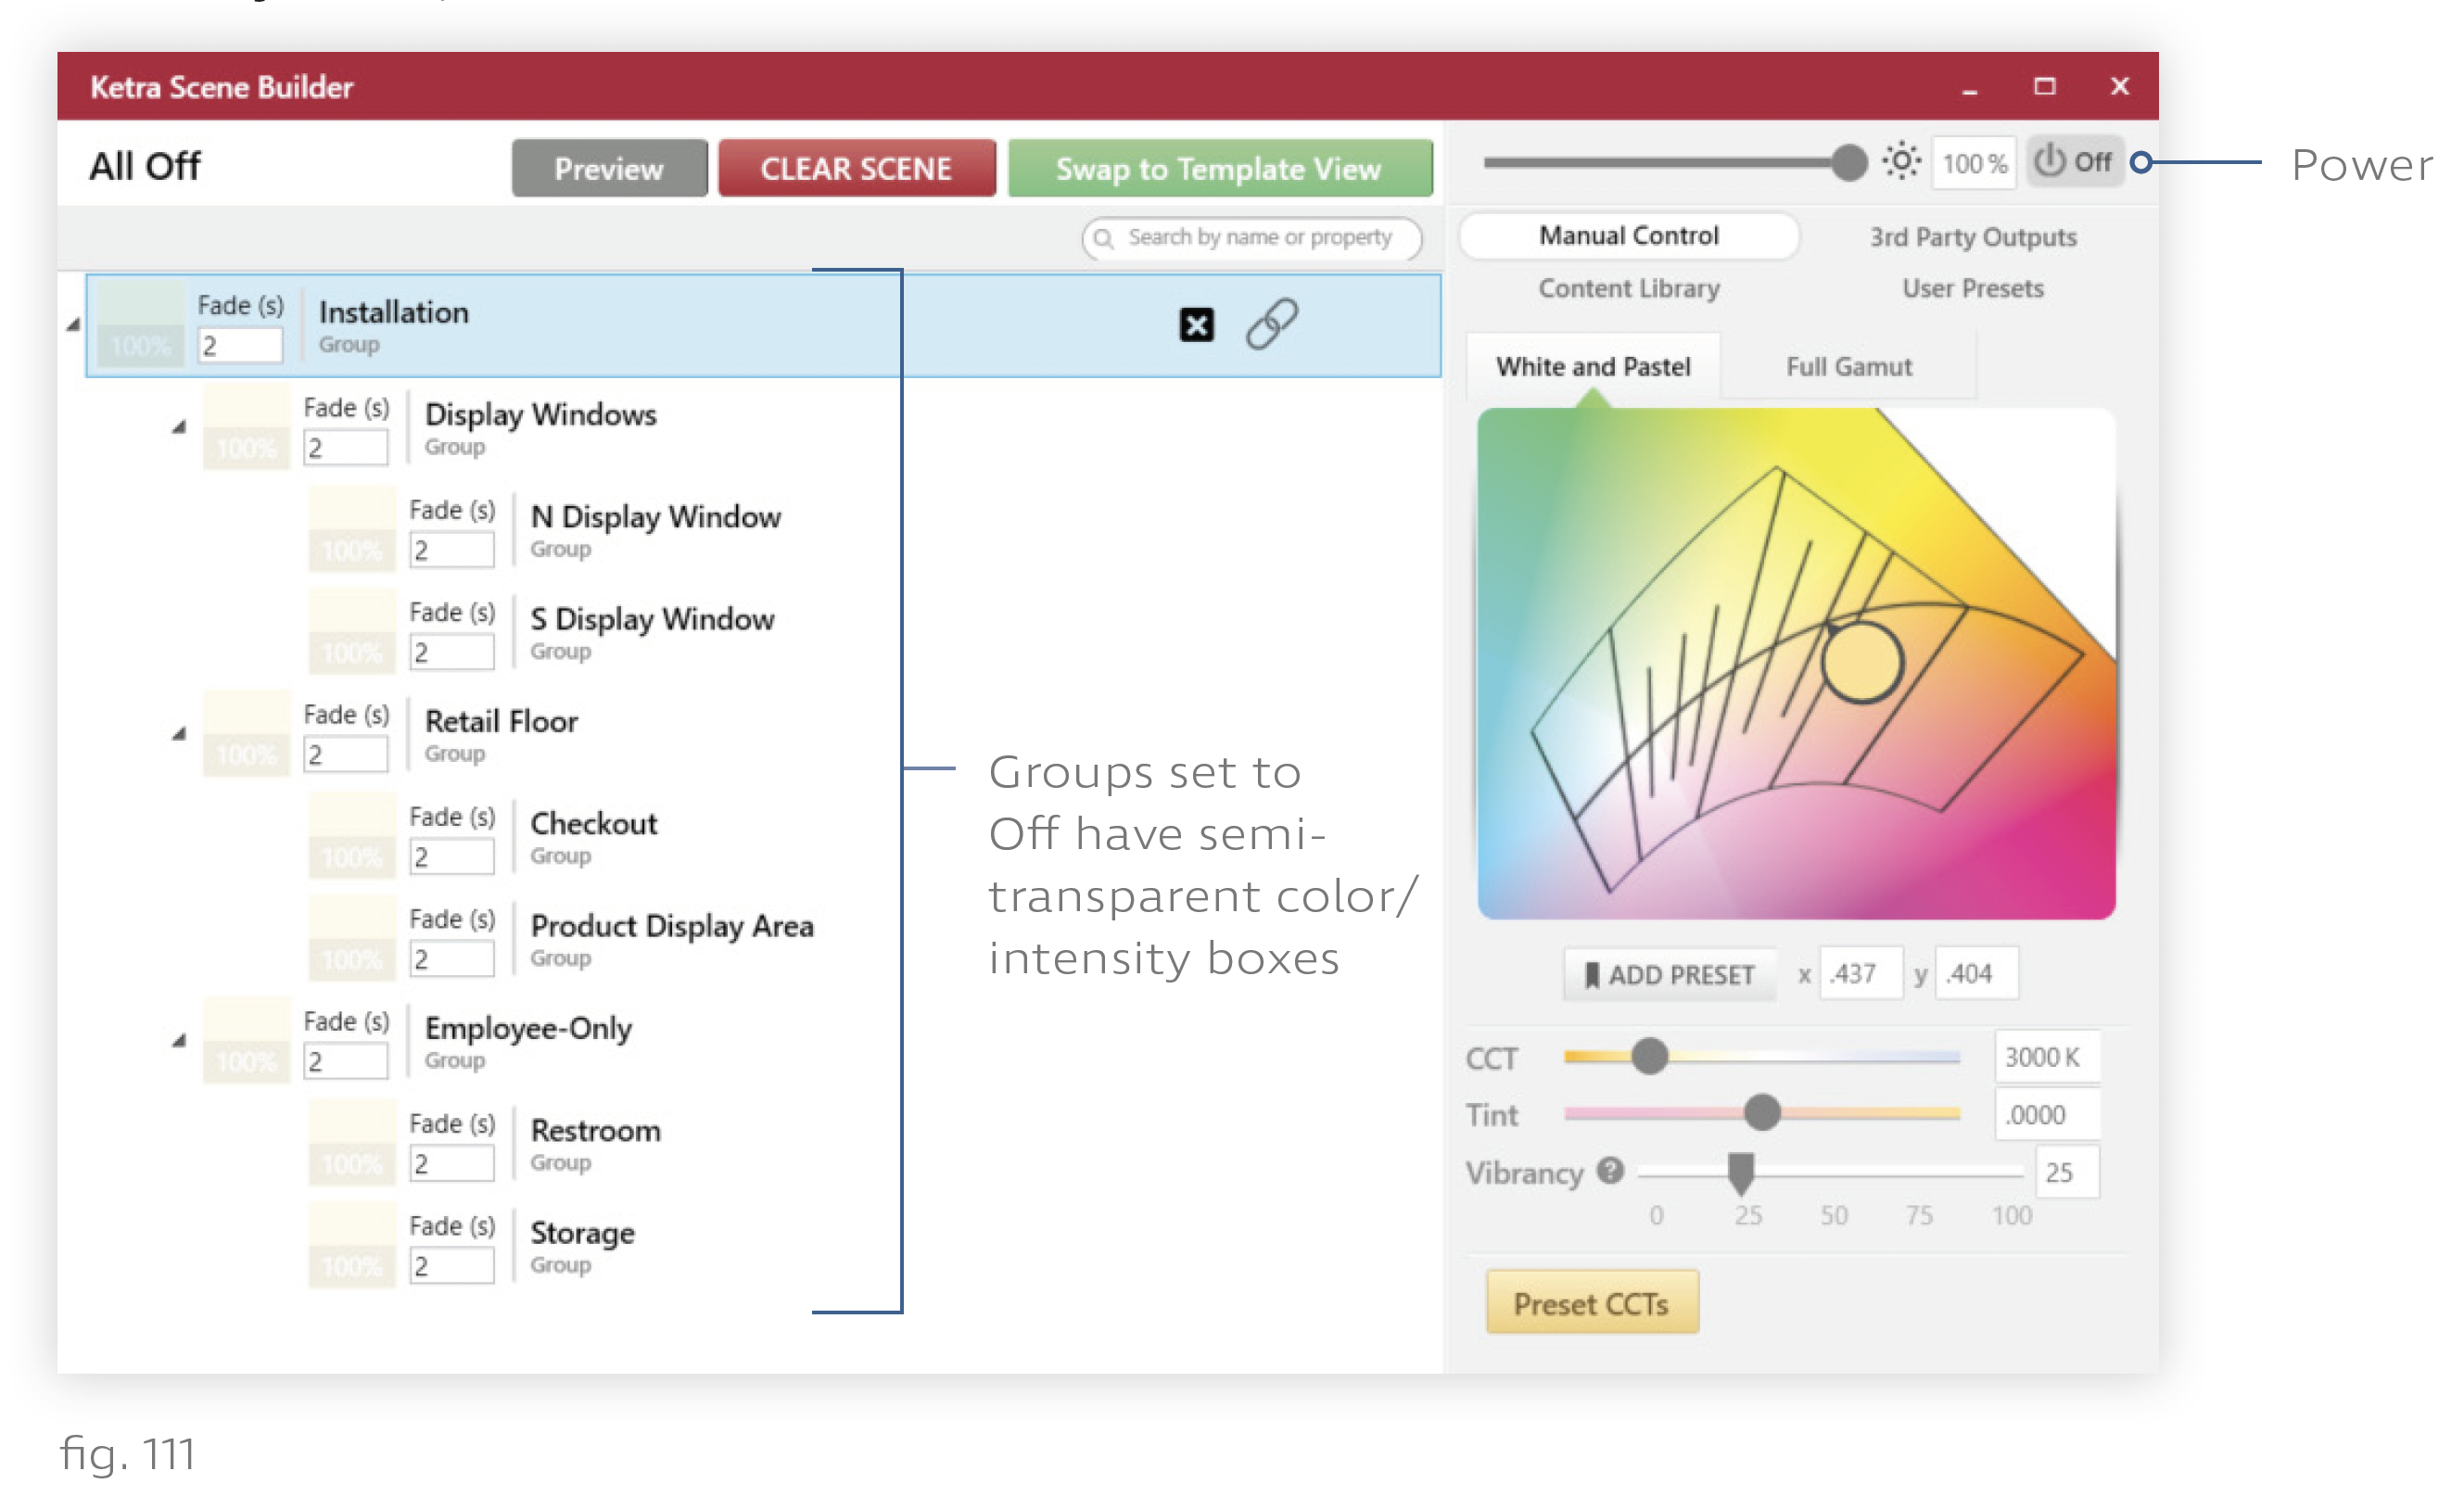
11. Close the Ketra Scene Builder window.
Repeat those steps for the weekend show, substituting configurations where appropriate. You can make a copy of the All Off scene this time. The finished Weekend Open/Close show should look like this:
After configuring both shows, click the Publish and Save buttons in the top-right corner.
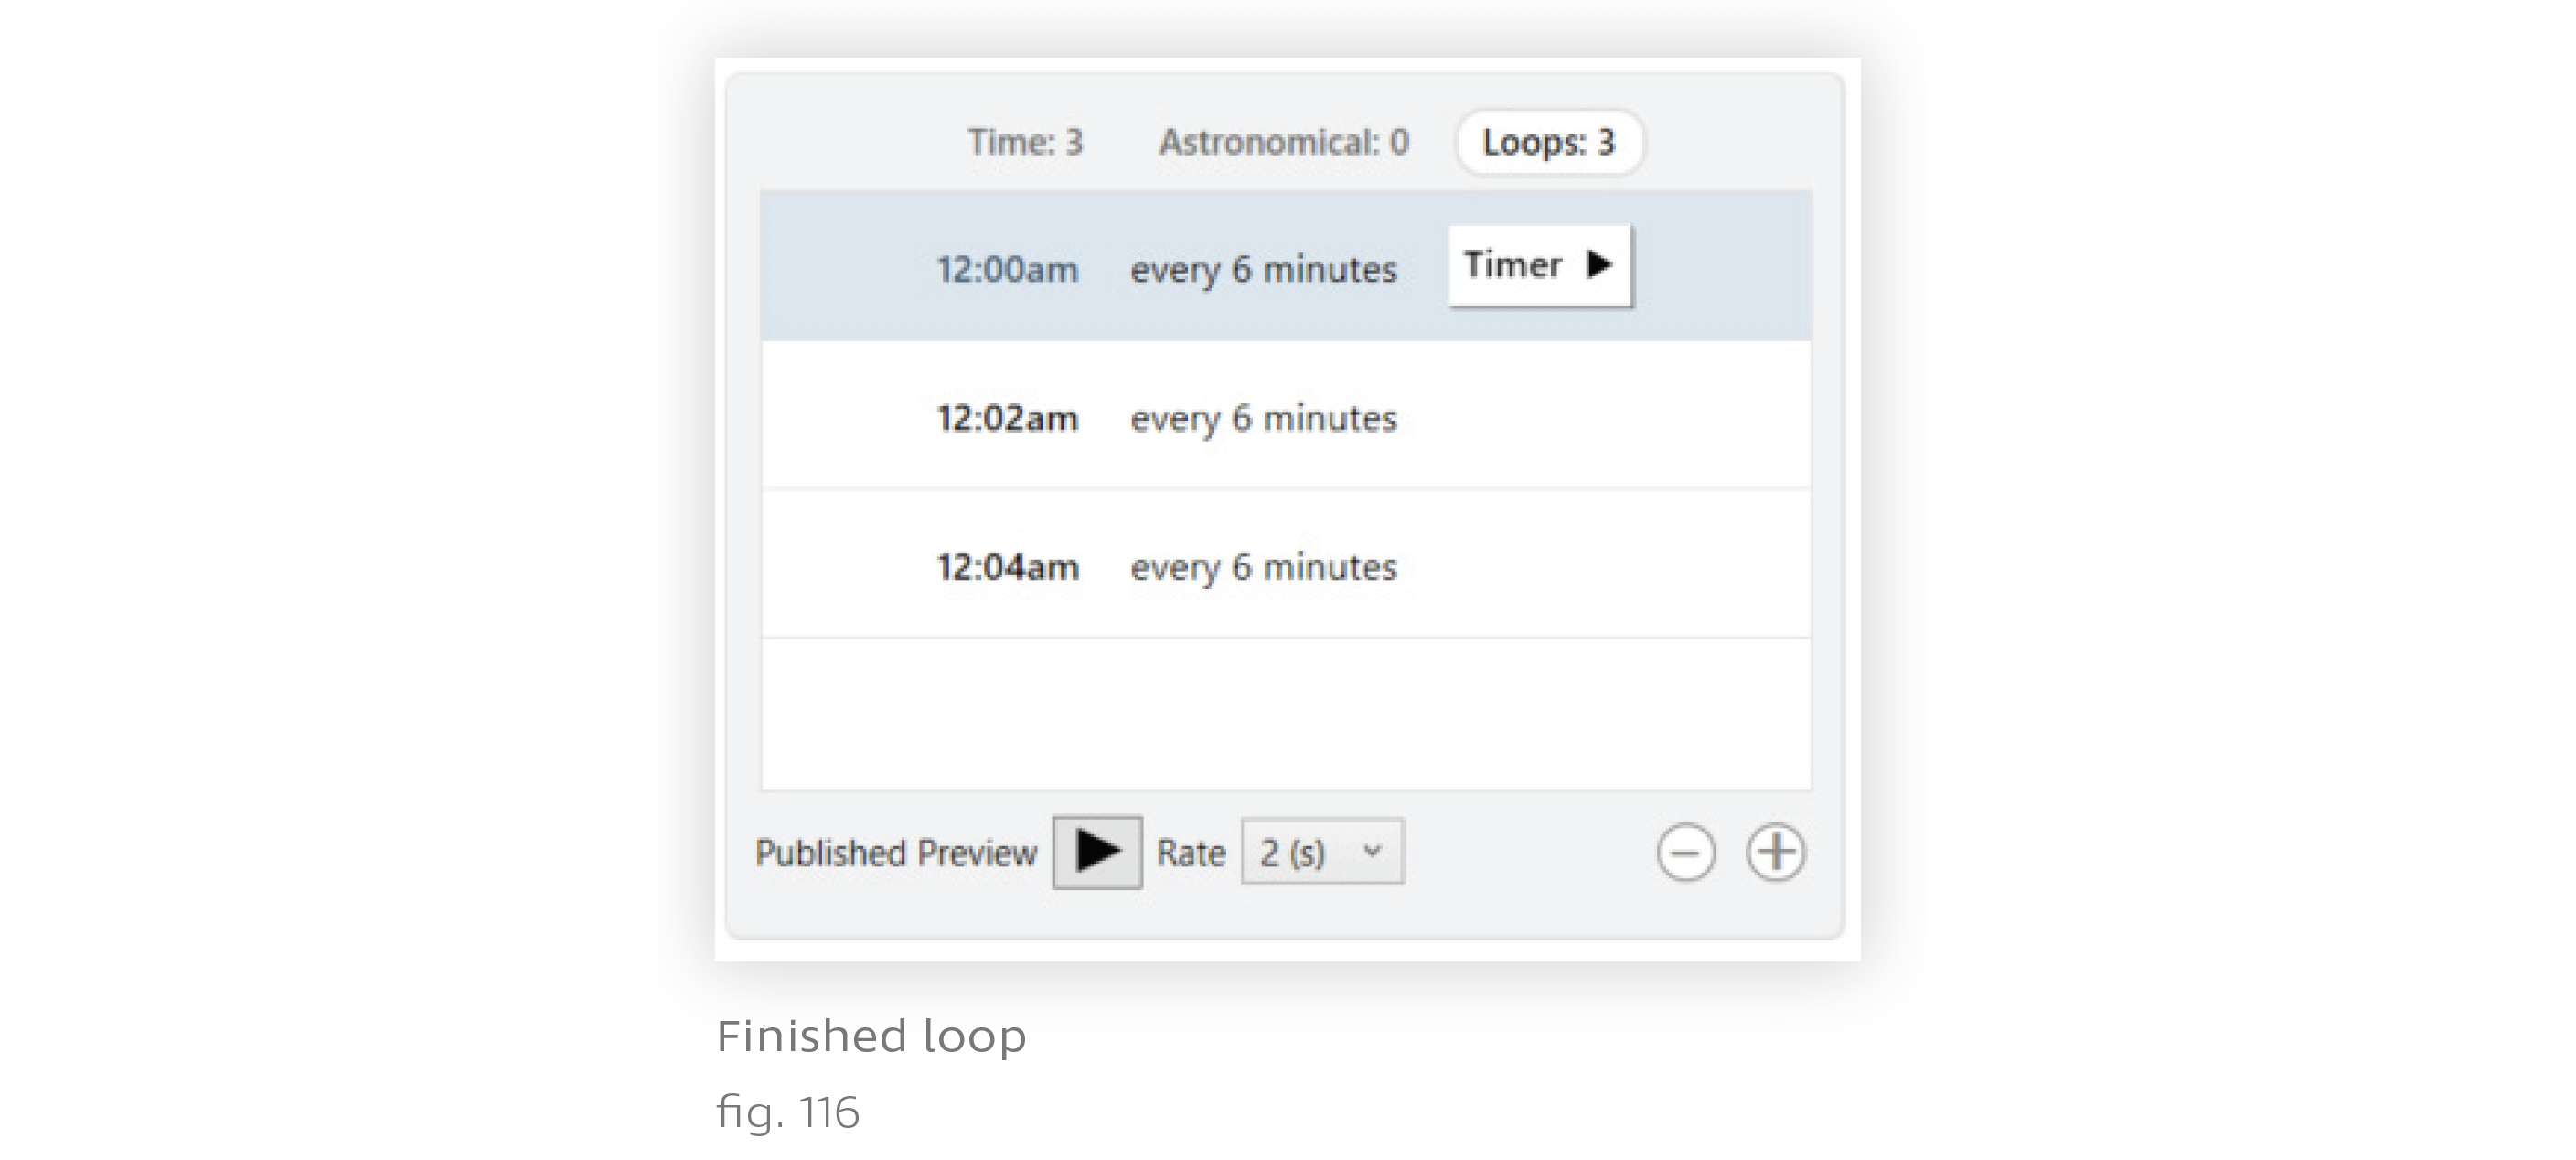
6-Minute Looping Show
Let’s create a six-minute loop with three triggers, where each trigger lasts two minutes. The loop will run all day, repeating every six minutes.
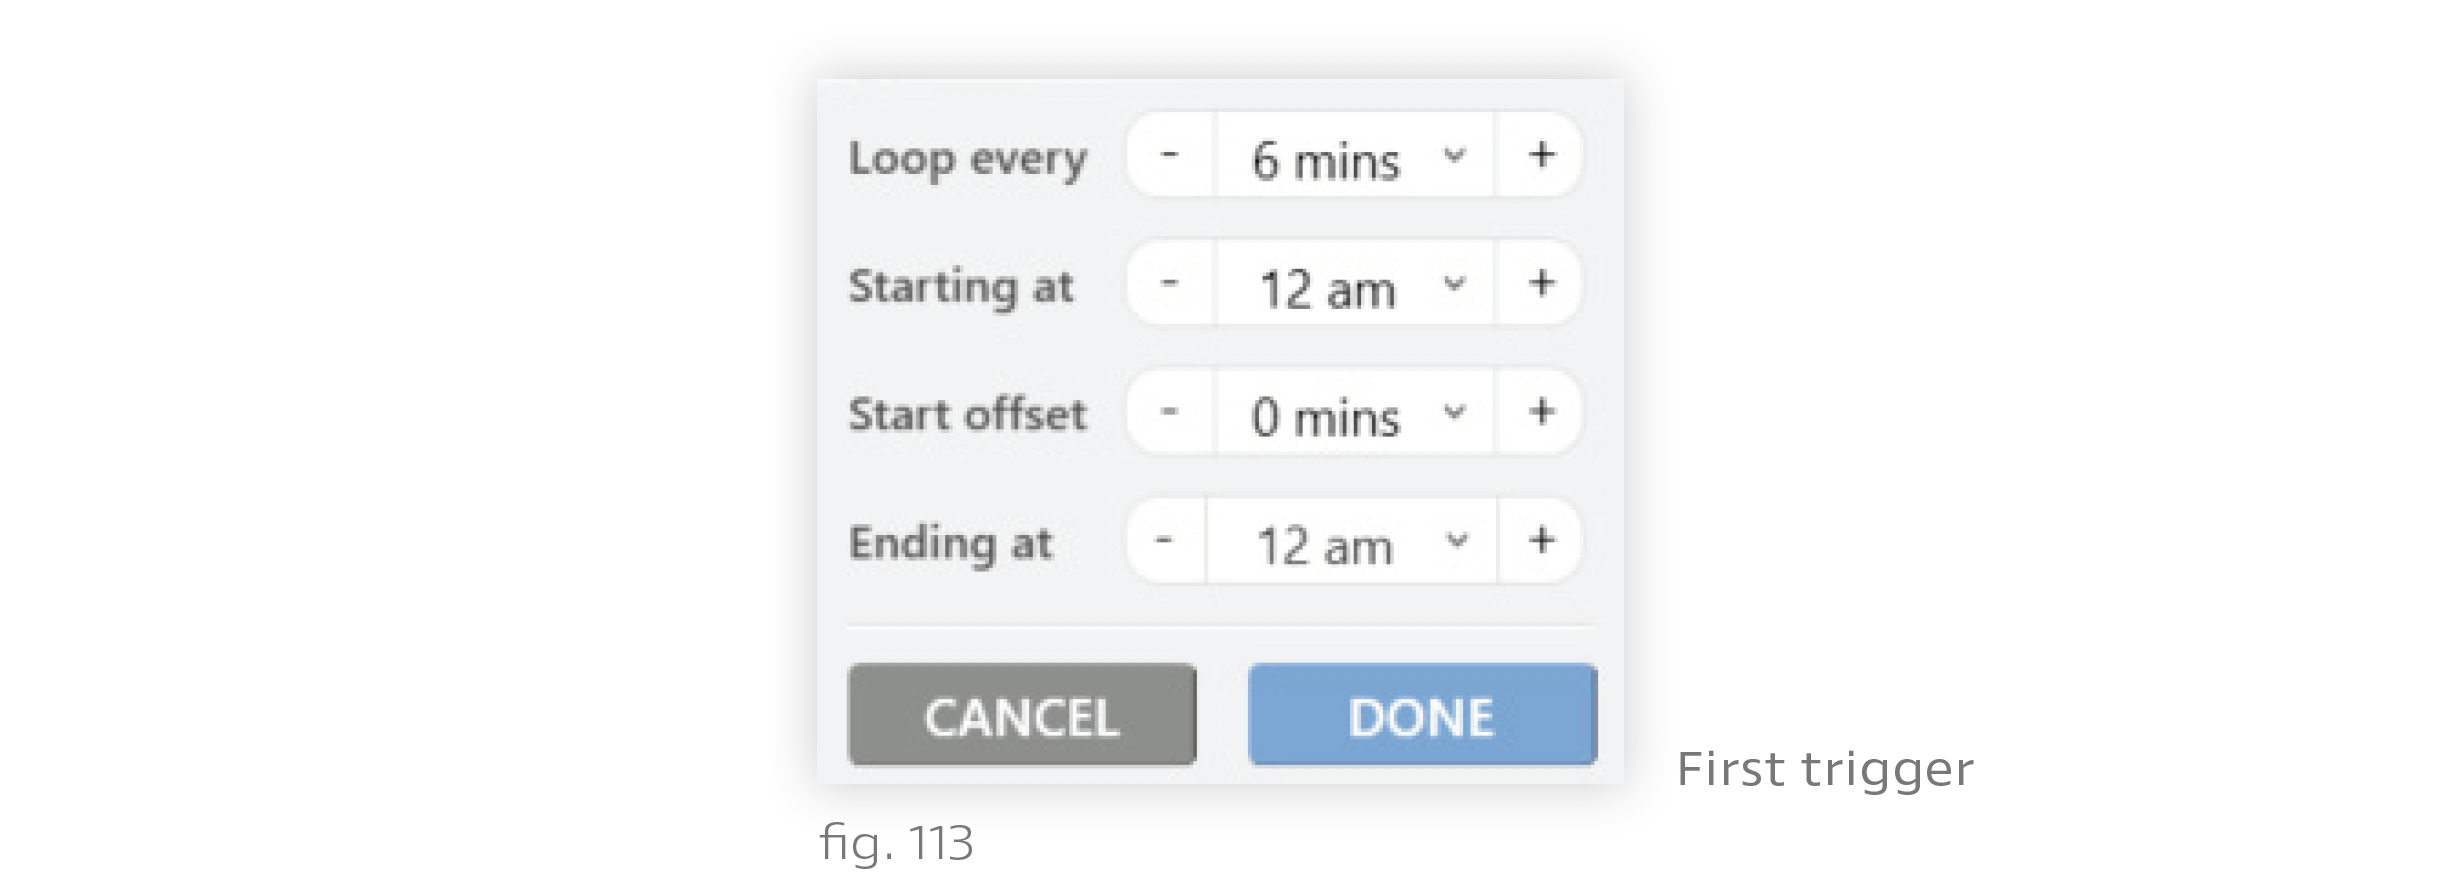
1. In the Loops subtab of the triggers list, click the + button three times. This creates three undefined triggers.
2. Highlight the first trigger and click Timer.
3. Set Loop Every to 6 mins.
4. Set Start Offset to 0 mins. This means that the first trigger will become active zero minutes into the loop.
5. Since we want the loop to run all day, leave Starting At and Ending At at their default value of 12 am.
6. Click Done.
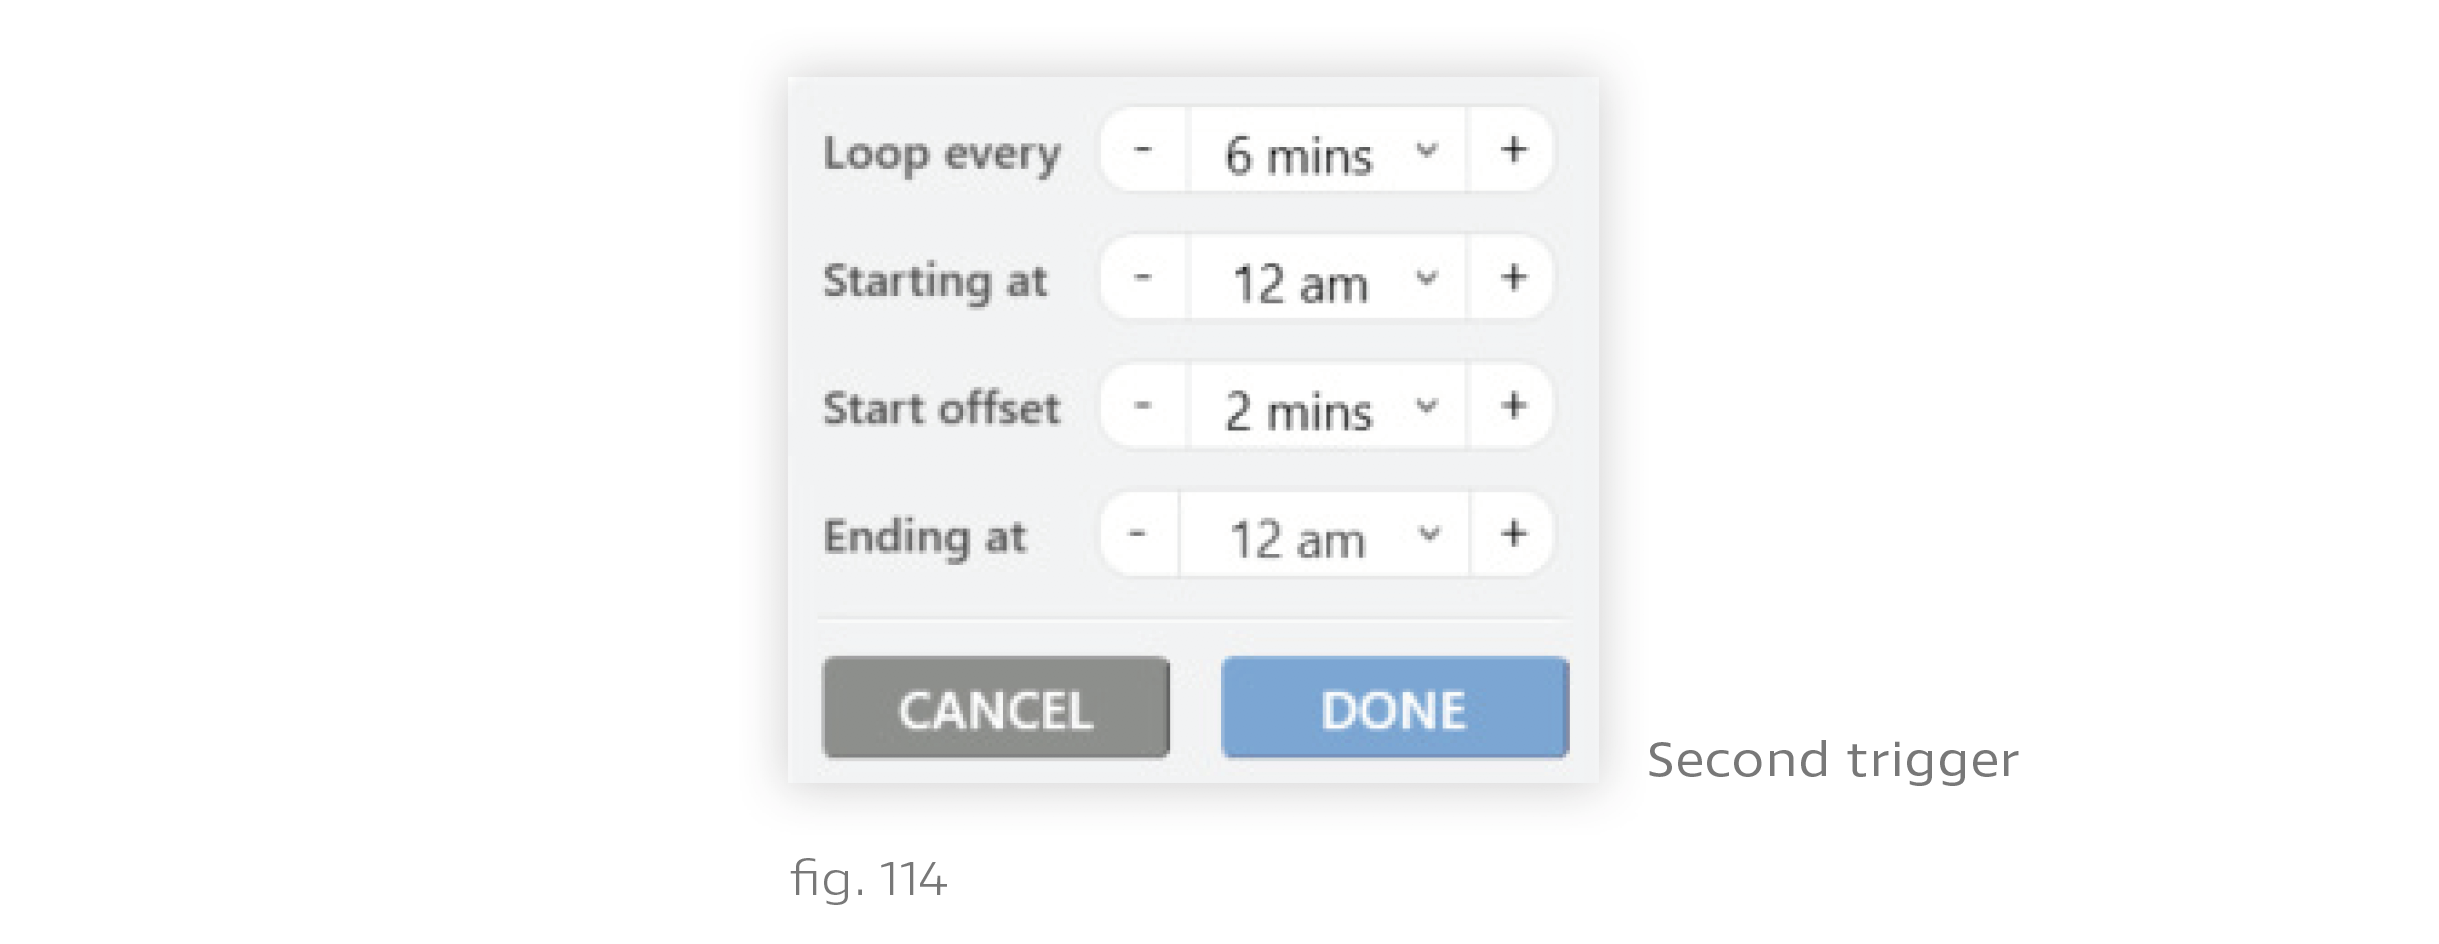
7. Highlight the second trigger and click Timer.
8. Repeat steps 3-5, this time setting Start Offset to 2 mins. Note that Loop Every should be the same as in the previous trigger. Setting Start Offset to 2 mins means that this second trigger will become active two minutes into the loop—i.e., after the first trigger gets its two minutes.
9. Click Done.
10. Highlight the third trigger and click Timer.
11. Repeat steps 3-5, this time setting Start Offset to 4 mins. Again, it is important that Loop Every be set to 6 mins. Setting Start Offset to 4 mins means that this third trigger will become active four minutes into the loop—i.e., after the first and second triggers have each had their two minutes.
12. Click Done.
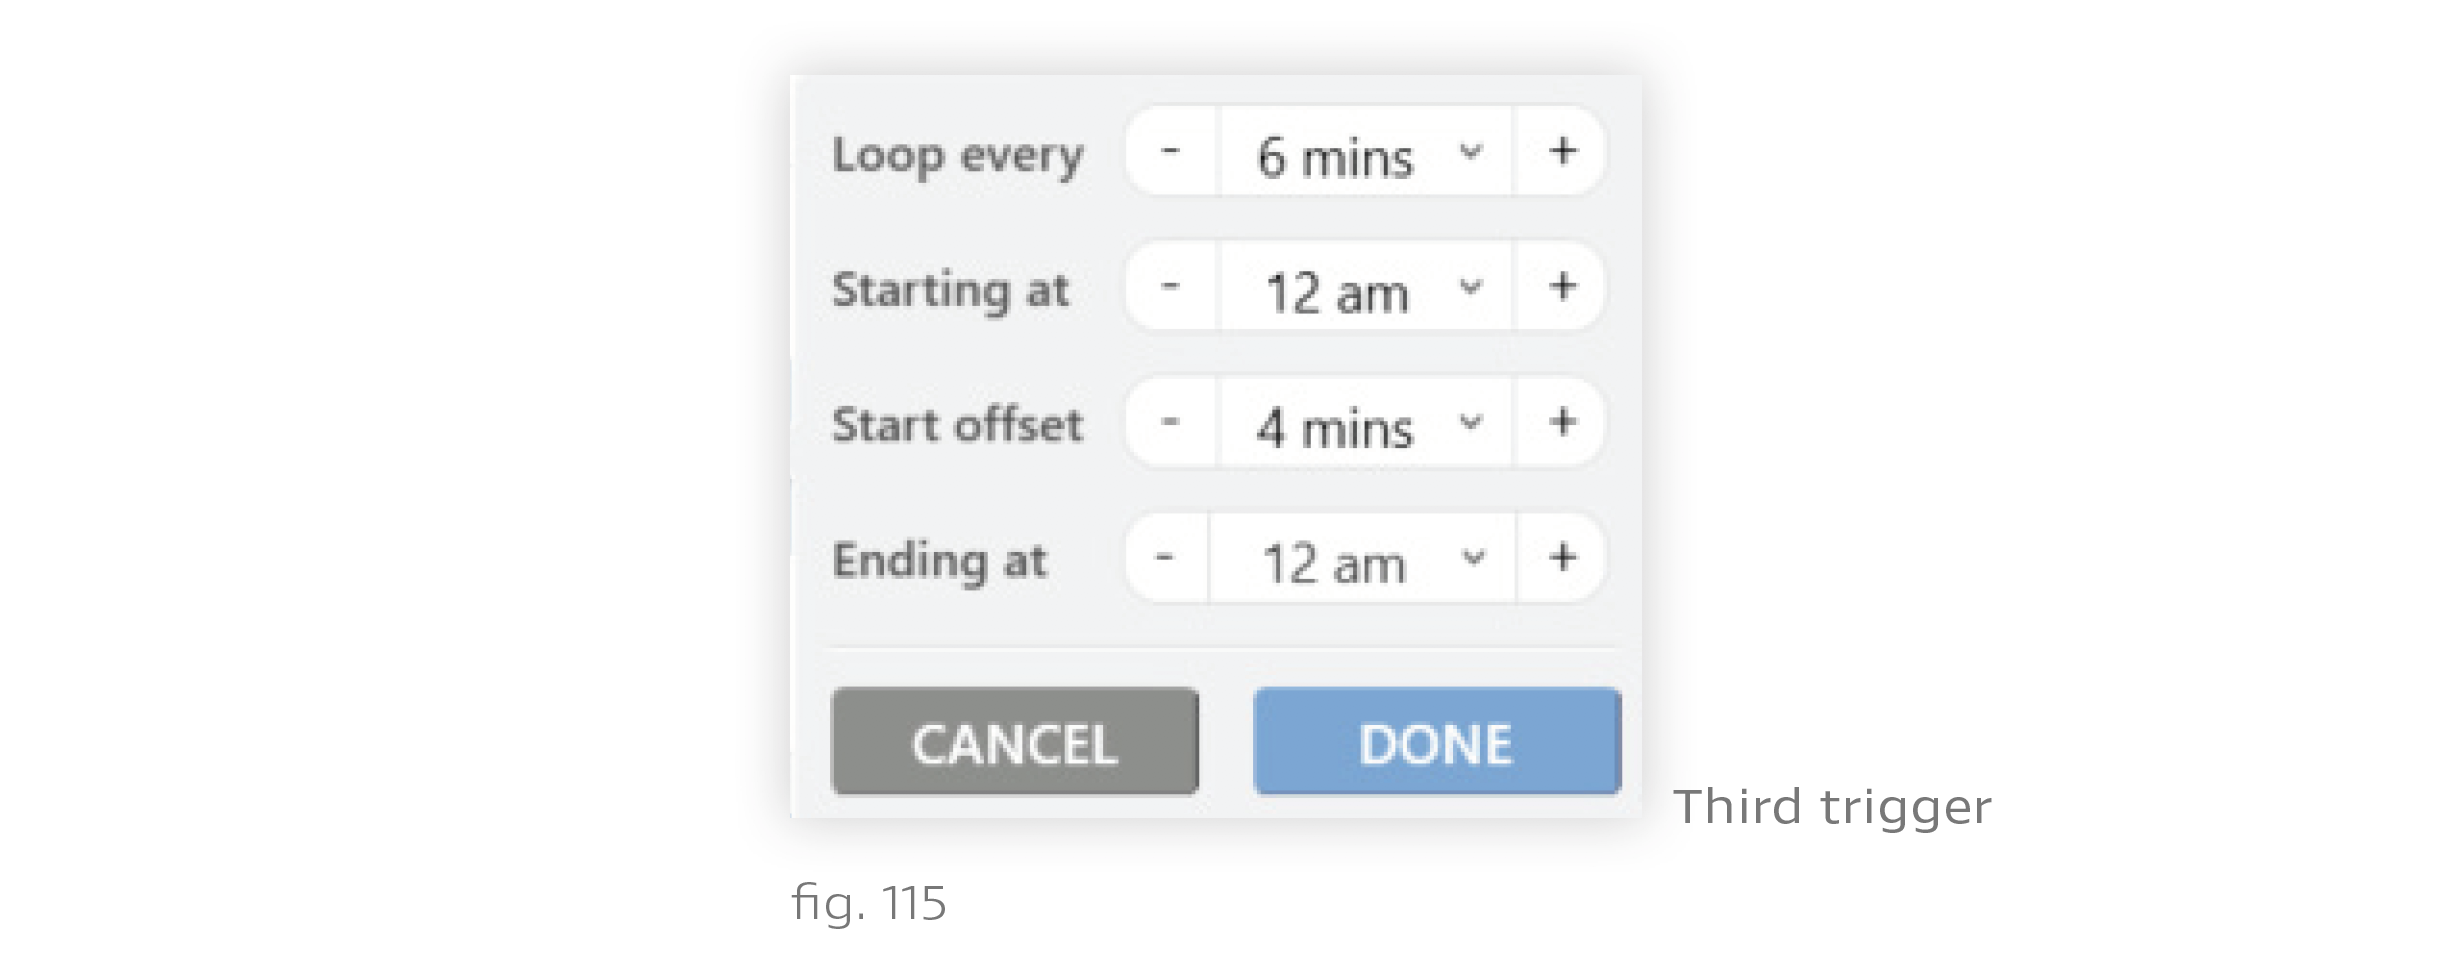
You now have a loop that repeats 3 triggers every 6 minutes, giving each trigger 2 minutes to run.
Note: Design Studio does not support configuring loops to start from the beginning when triggered by a keypad button or contact closure. Looping goes on in the background at all times, even when the show is not active, so keypads and contact closures can only start the loop at whatever scene is currently active.