
Note: The N3 Satellite can be configured for DMX output in both Ketra Only and Ketra with HomeWorks QS installations.
An N3 Satellite properly configured for DMX output enables the Ketra system to control third-party lighting and other devices. The N3 can output a full universe of DMX-512A using a variety of profiles. It will refresh the receivers’ settings at a rate of 44 Hz (i.e., 44 times per second) to ensure quick correction of any transmission errors.
For every scene in the installation, you can define specific output settings for each DMX profile range. An example application would be that when a user presses Scene 2 on a Ketra or HomeWorks QS keypad, the N3 Satellite sends out 0, 119, and 255 for an RGB profile on channels 1-3; this would cause any RGB-enabled receivers listening to those channels to go to an aqua color.
Not including wiring, the workflow is as follows:
1. Configure profile ranges for DMX output in Ketra Tech Tool.
2. Sort each profile into a Ketra group in Design Studio.
3. Customize each group as part of a scene in Design Studio.
4. Assign the scene to an input source, i.e., a HomeWorks QS keypad button, Ketra keypad button, contact-closure input, or time trigger in a show.
5. Configure profile ranges in Tech Tool
i. Open the installation in Ketra Tech Tool.
ii. On the DMX Output tab, select an N3 Satellite to configure.
iii. Click Add New Profile.
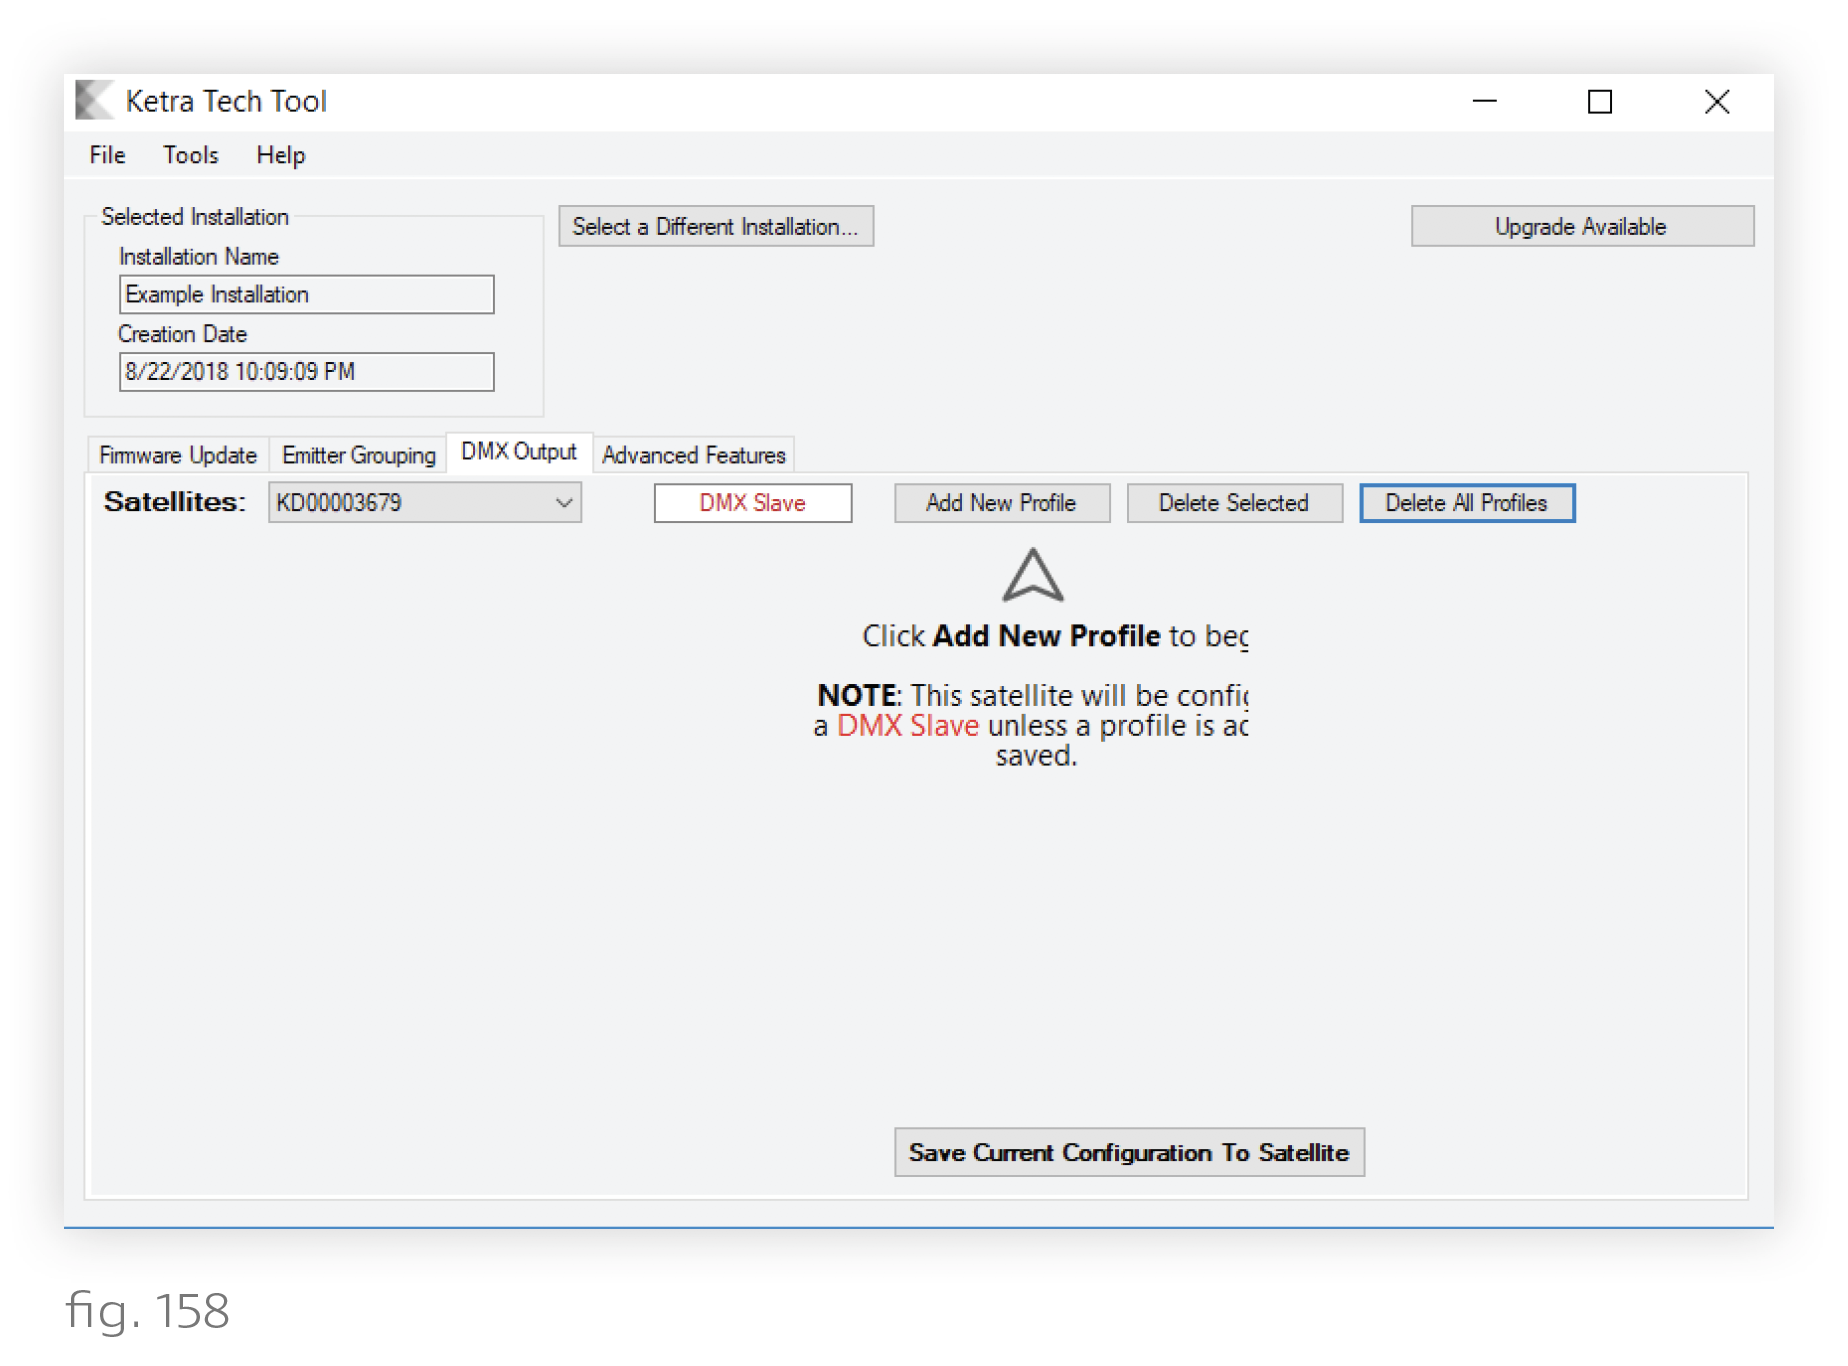
iv. Set the profile and channel range, then give the profile a descriptive name. The name will help you identify the profile later on when adding it to groups. When selecting a profile, reference the table below as a key to the profile parameters. (Step 1 continued after table)
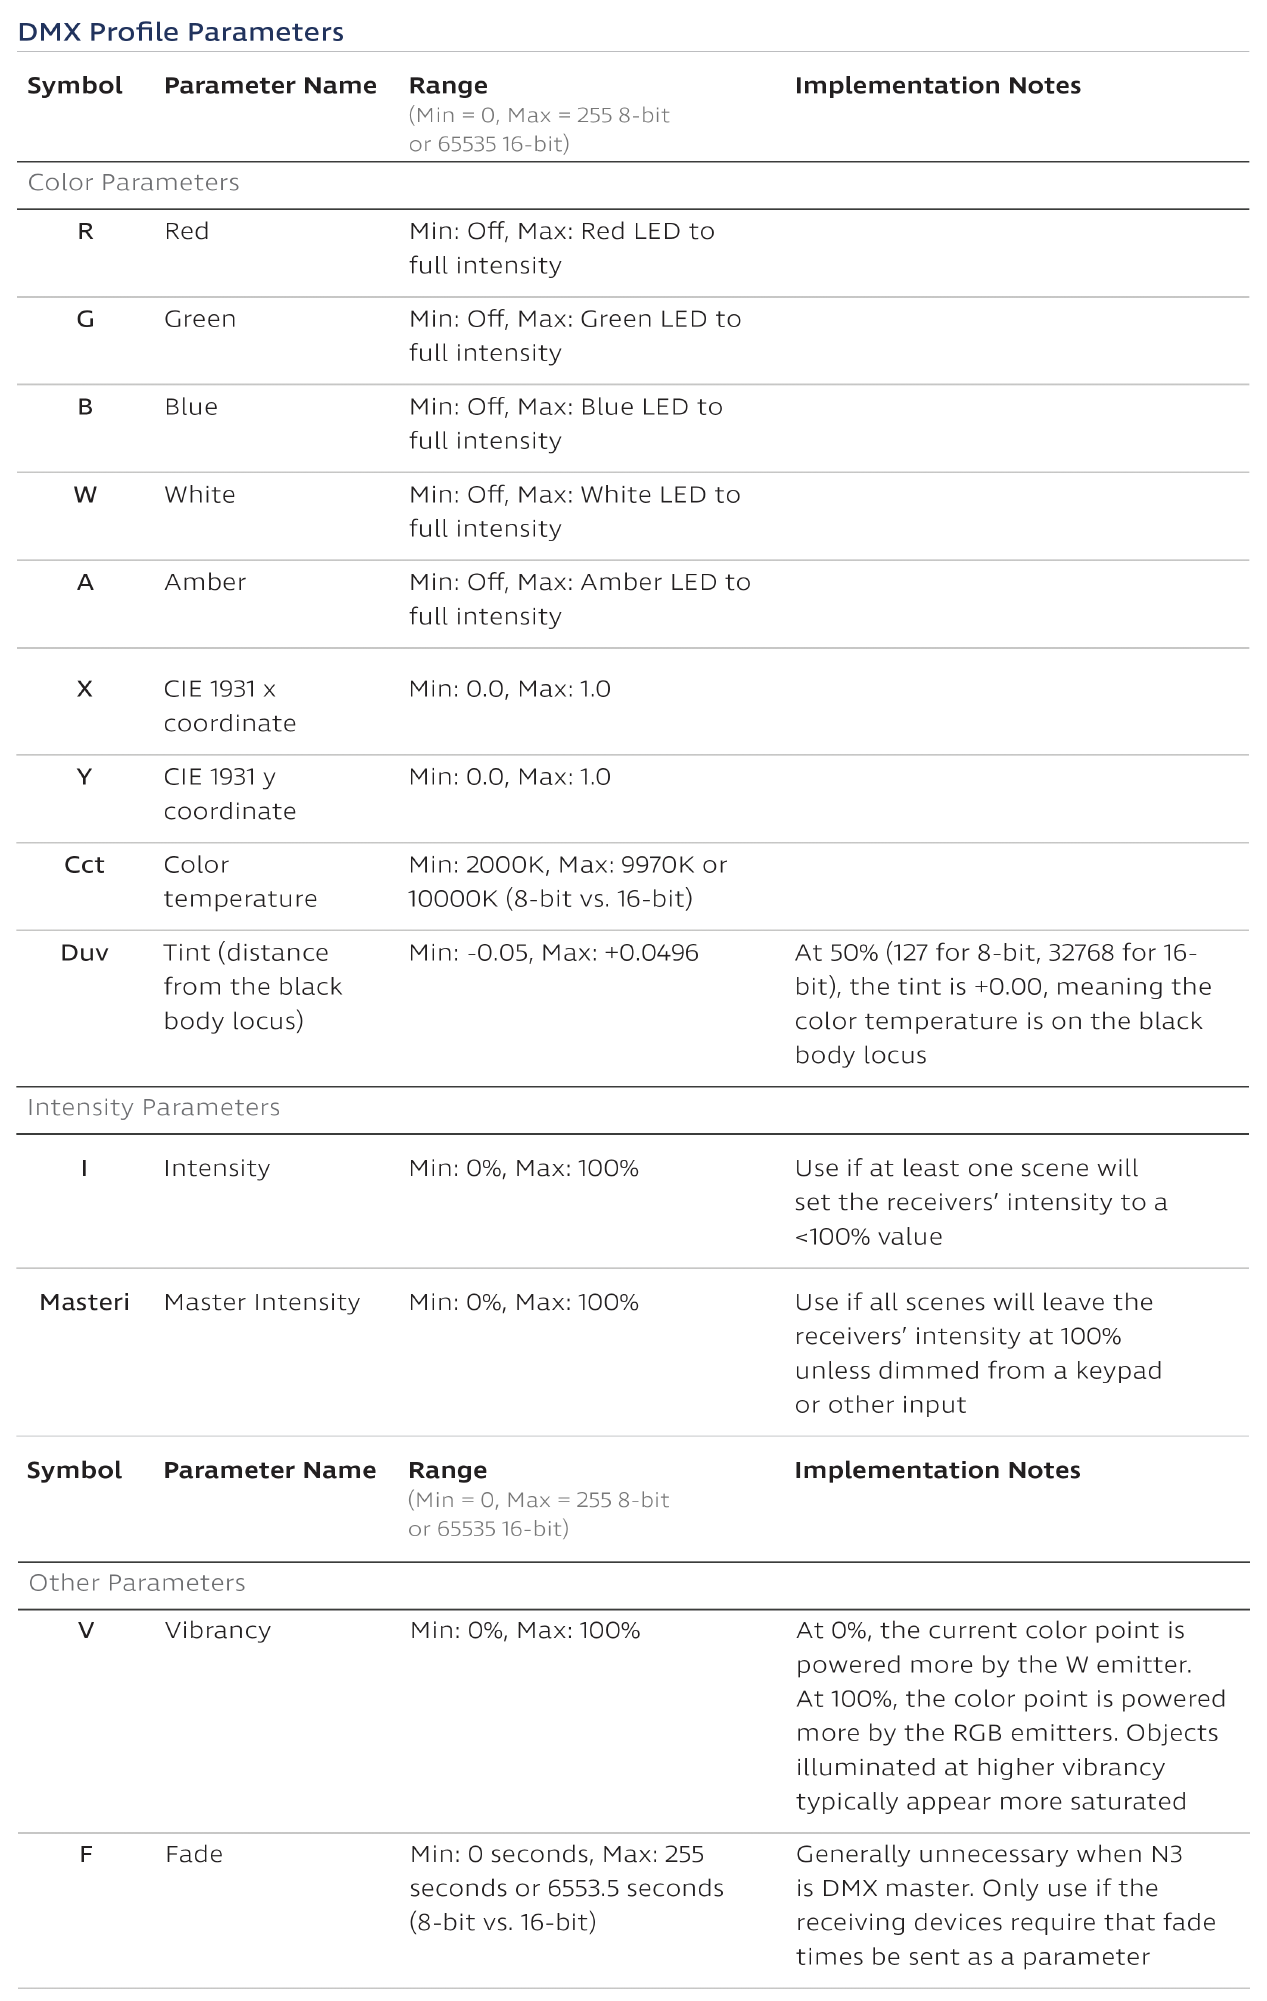
Note: You will only be able to dim third-party lighting controlled by DMX if you choose an RGB/RGBA profile or any profile with an intensity parameter (‘I’ or “Masteri”). In RGB/RGBA profiles, the minimum value for each channel will turn the corresponding LED off, meaning that if all those channels are at 50%, the light will be at 50% intensity. By contrast, a CCT parameter’s minimum value does not equate to Off but rather to 2000K, so without an accompanying intensity parameter, it will be stuck at 100% intensity.
v. Repeat steps 1.iii-1.iv for additional profiles, one at a time.
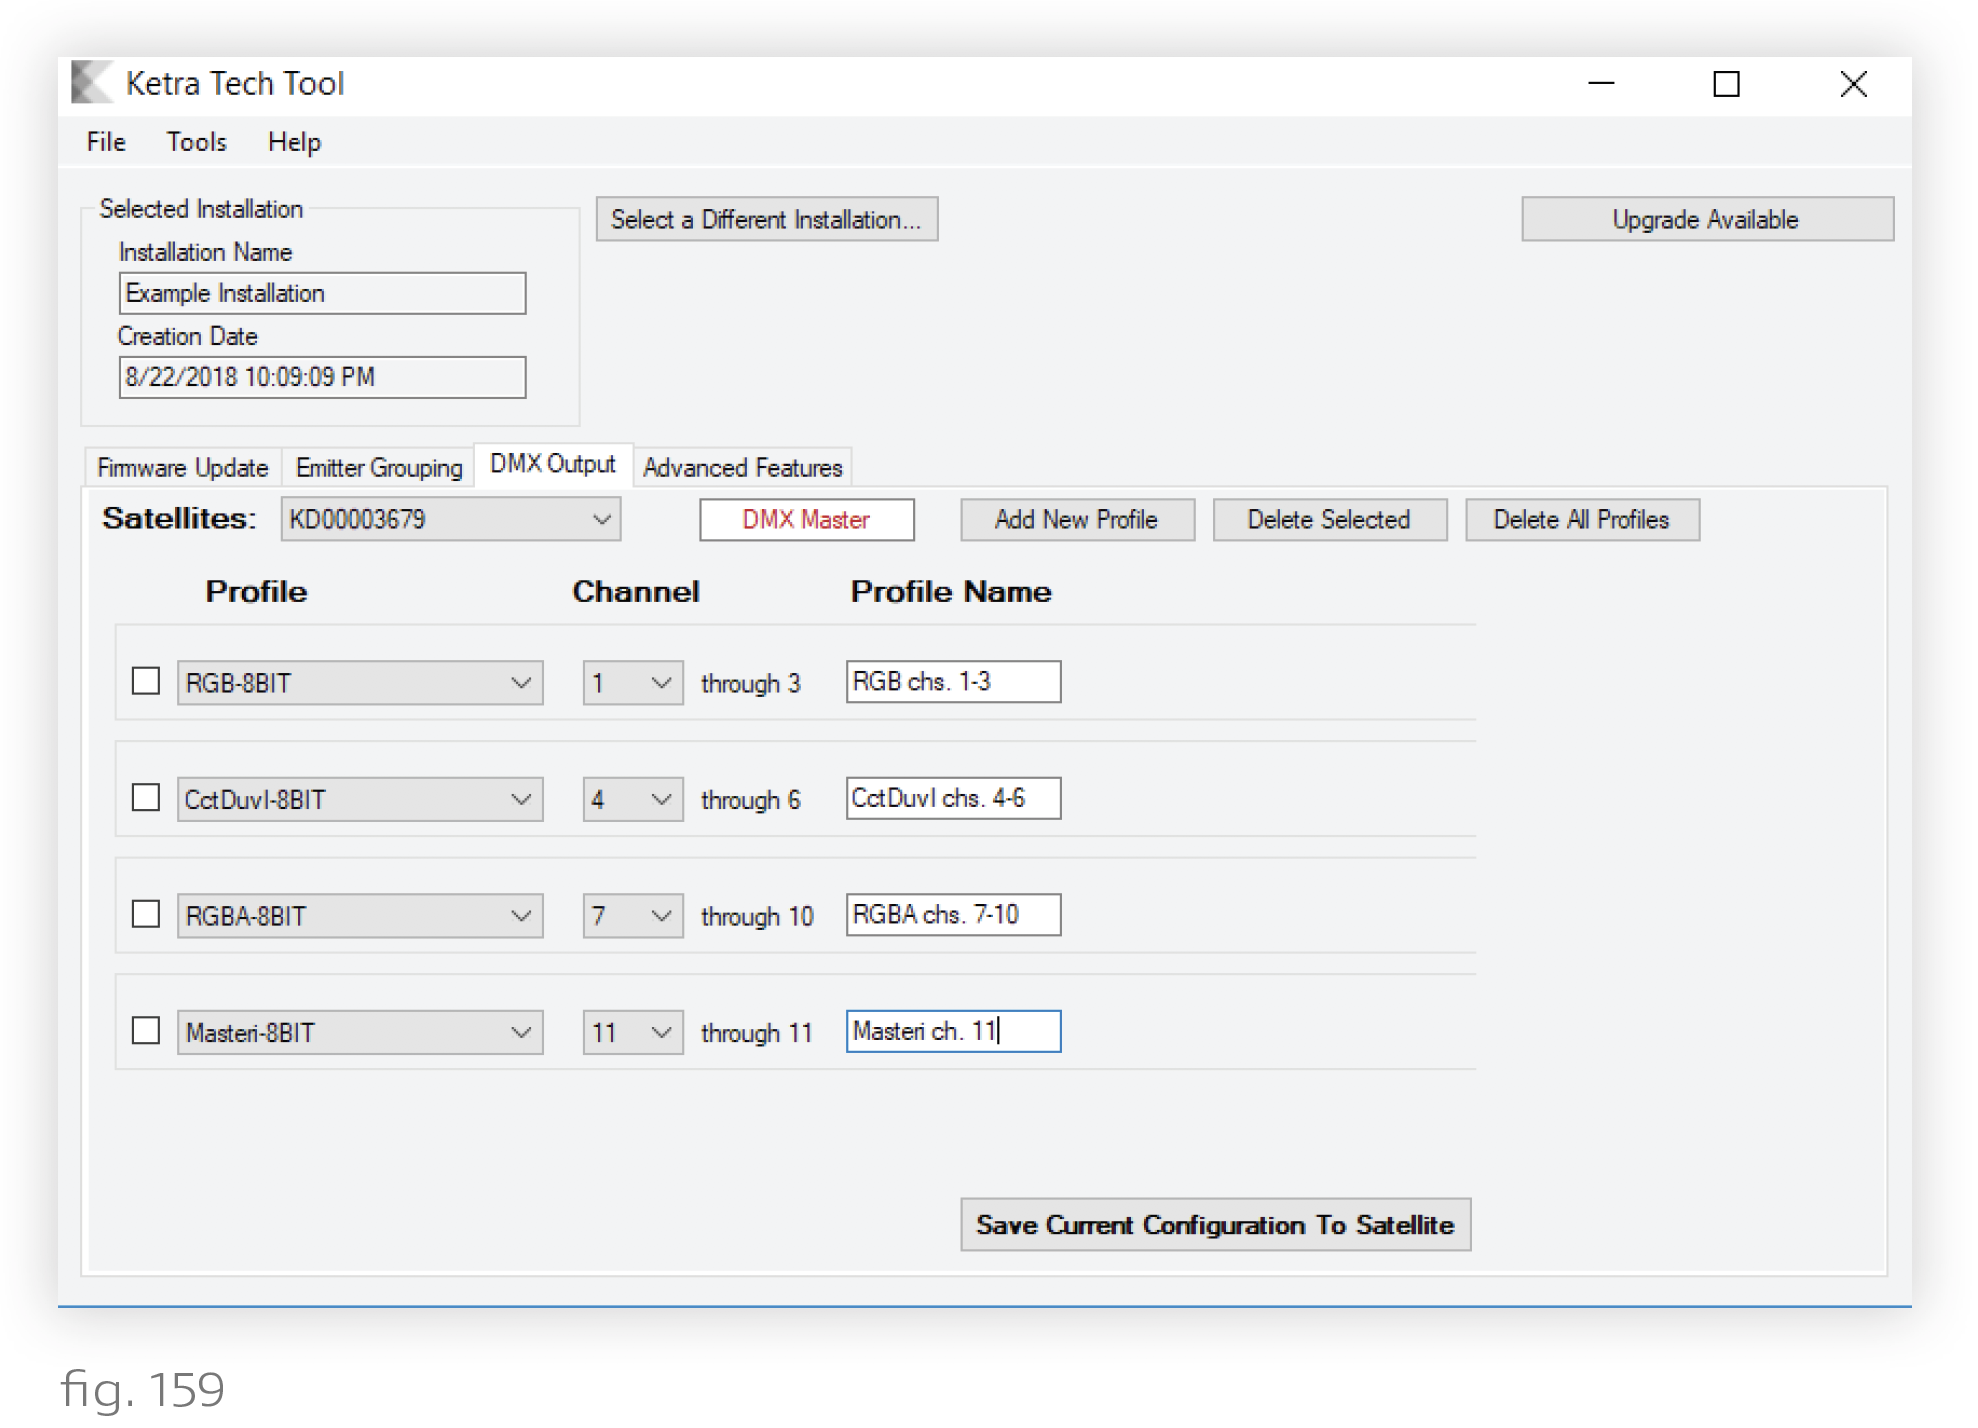
vi. Click Save Current Configuration To Satellite. This assigns your DMX Output configurations to the N3. Note that this step will fail if the N3 is not powered on.
6. Sort profiles into groups in Design Studio
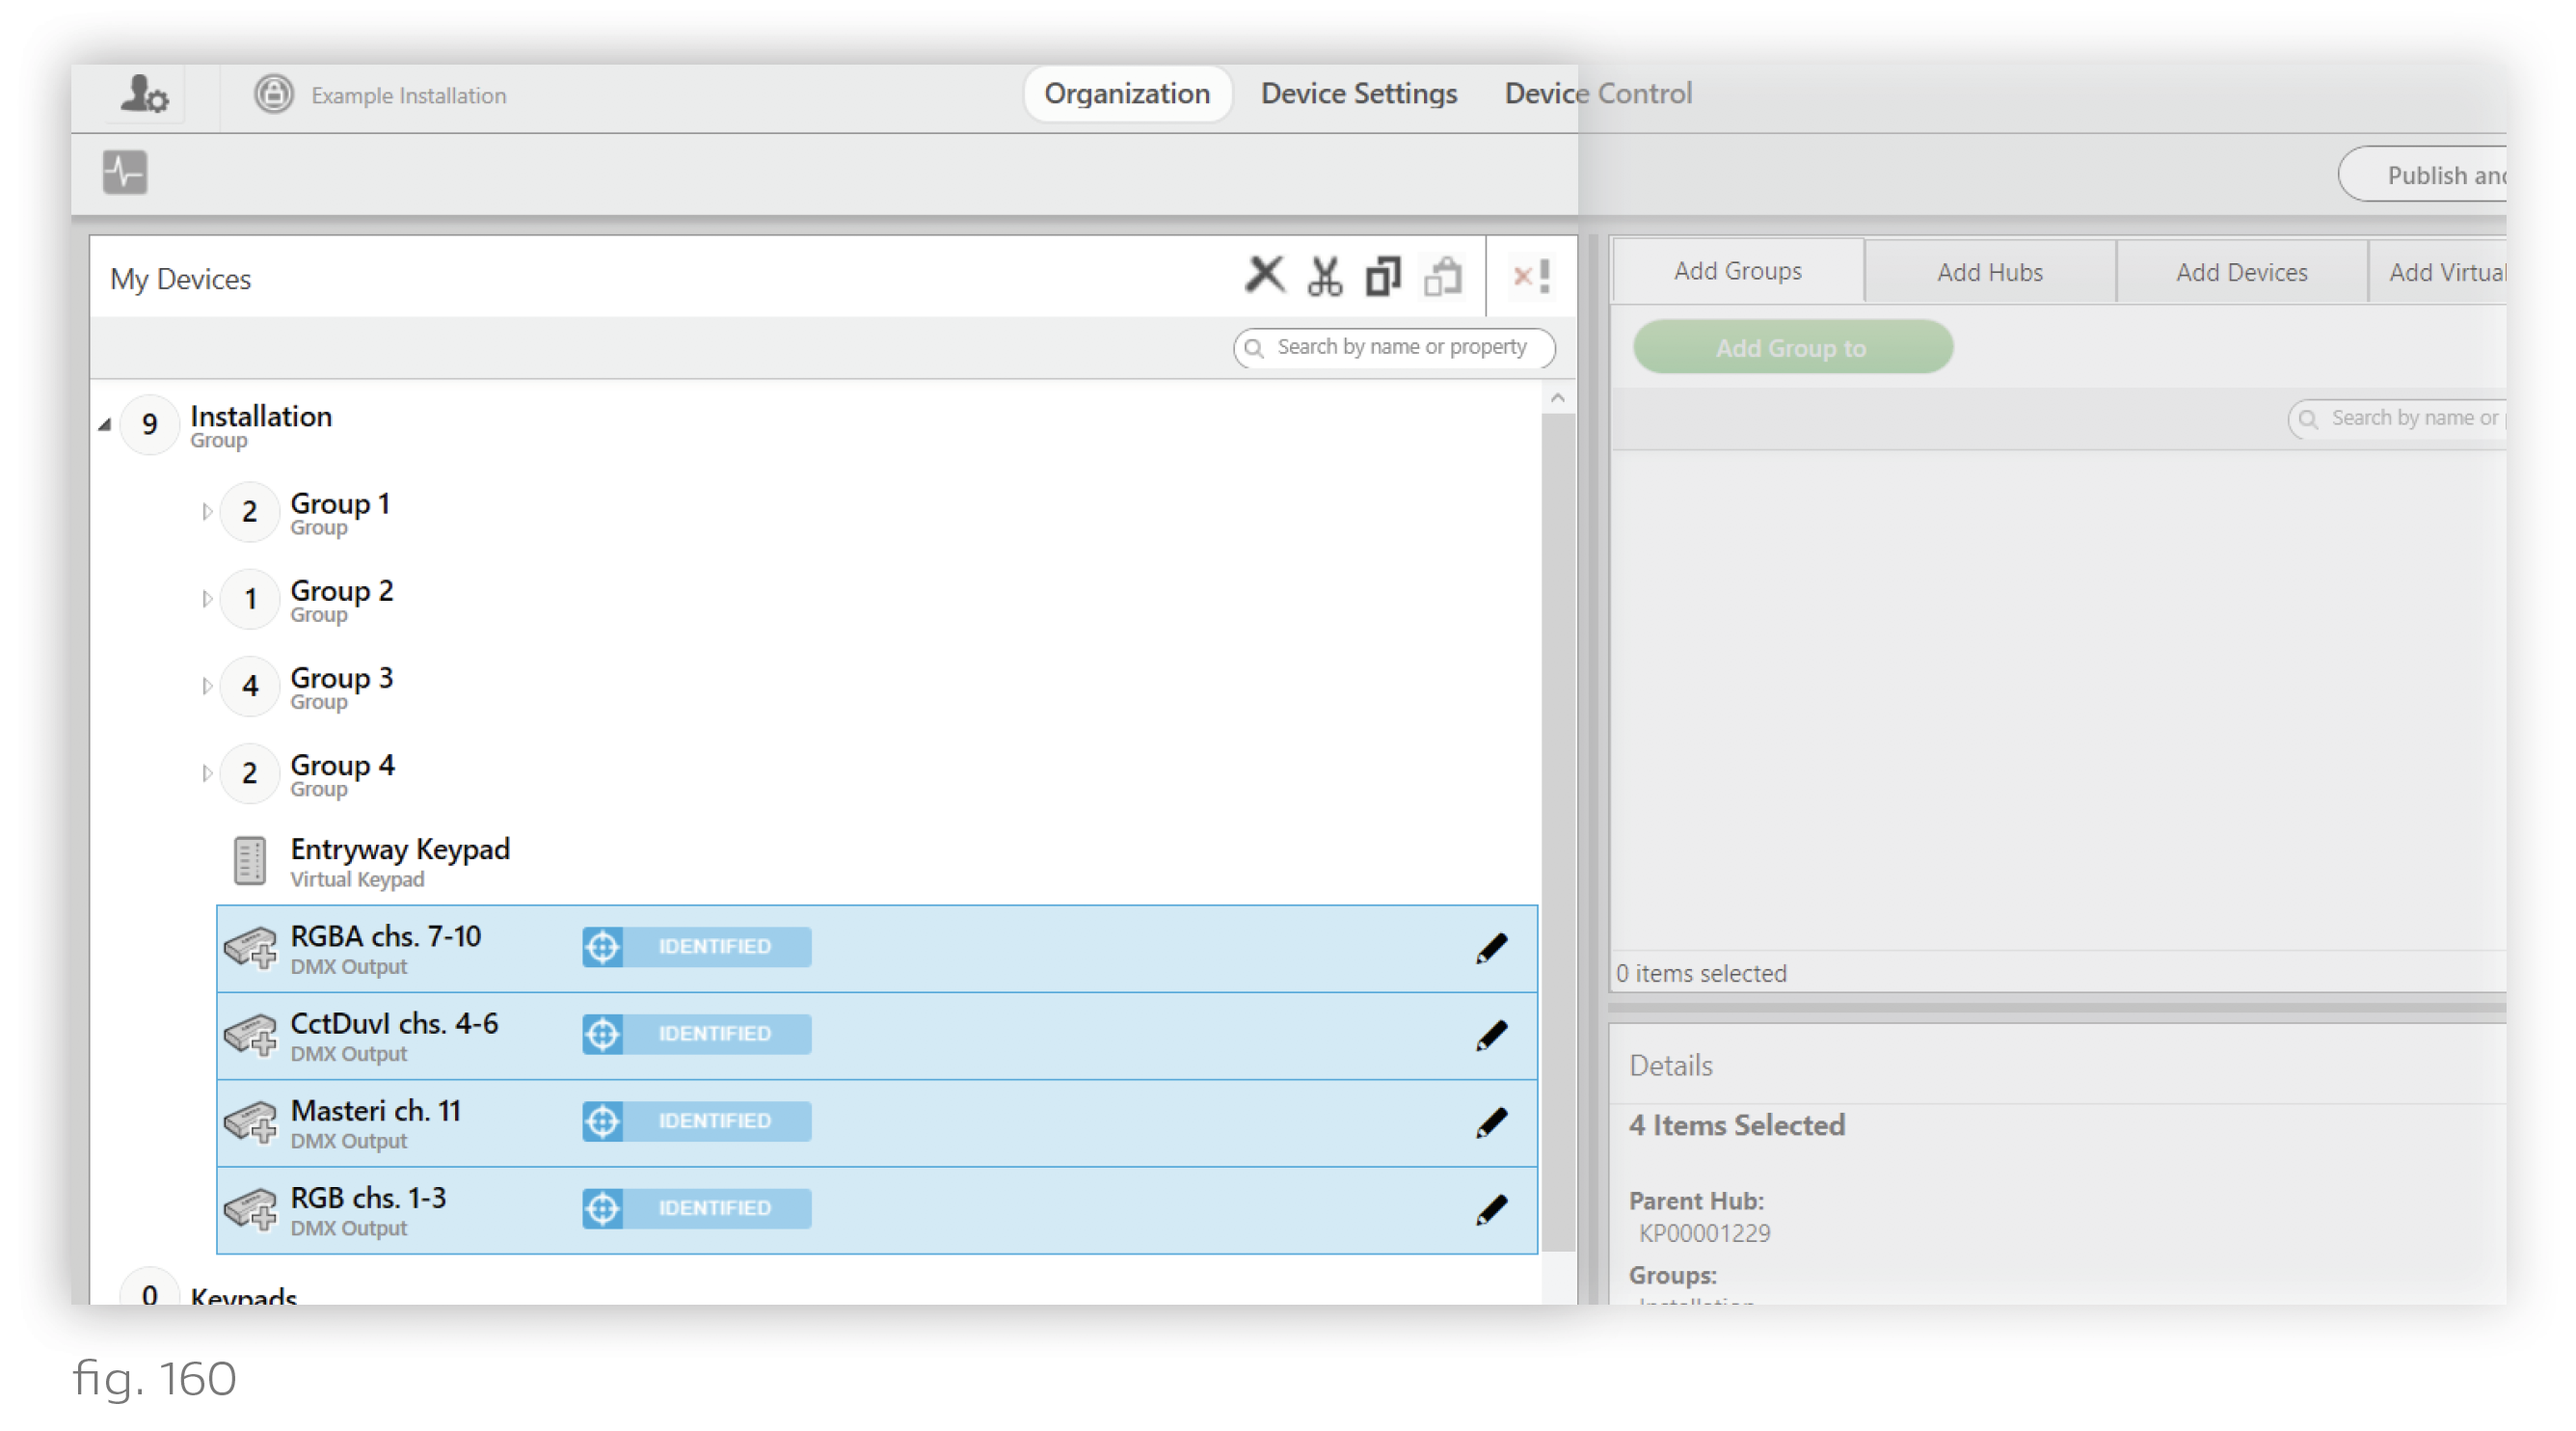
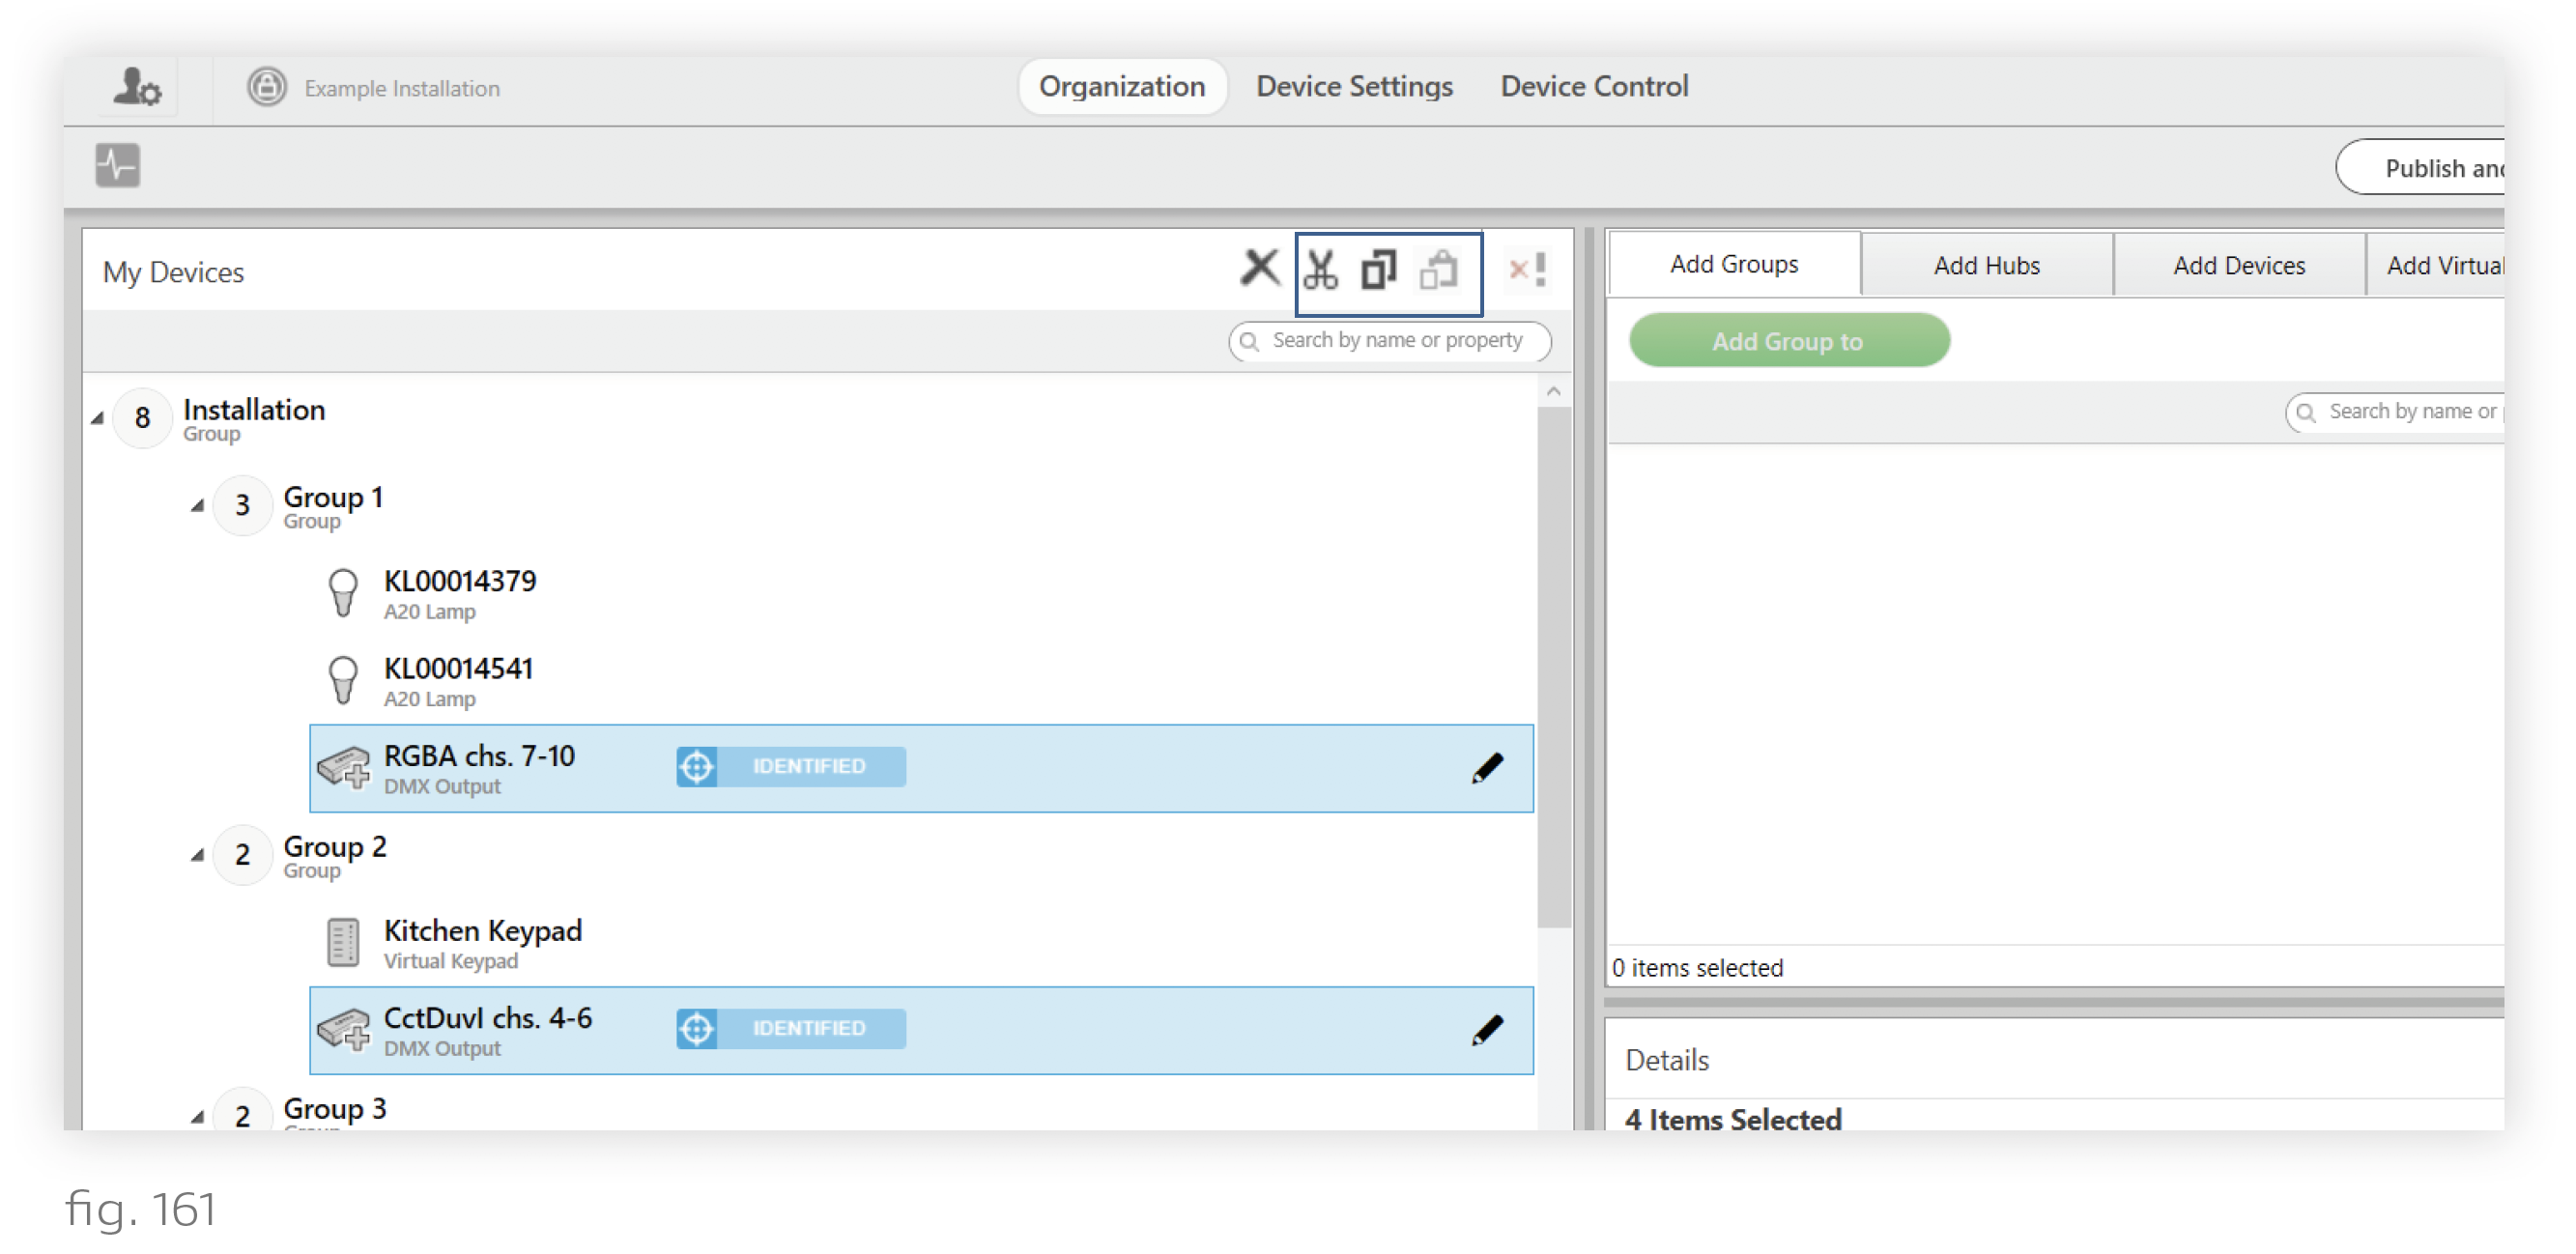
i. Open the installation in Design Studio. On the Organization tab, you should see your DMX outputs in the My Devices list, as shown in fig. 160.
You can think of each of these outputs as representing the DMX receivers listening to the channel range. For example, the “RGBA chs. 7-10” output in fig. 160 might represent several third-party LEDs with addresses of 7 that are listening for RGBA input. It might be more intuitive to imagine sorting those into a group rather than sorting the profile into a group.
ii. Sort the profiles into groups using the Cut/Copy/Paste buttons or shortcuts. The buttons and corresponding shortcuts are shown in fig. 161. Note that you can have the same profile in multiple groups if needed. For example, you could use third-party lights as everyday lighting and safety lighting.
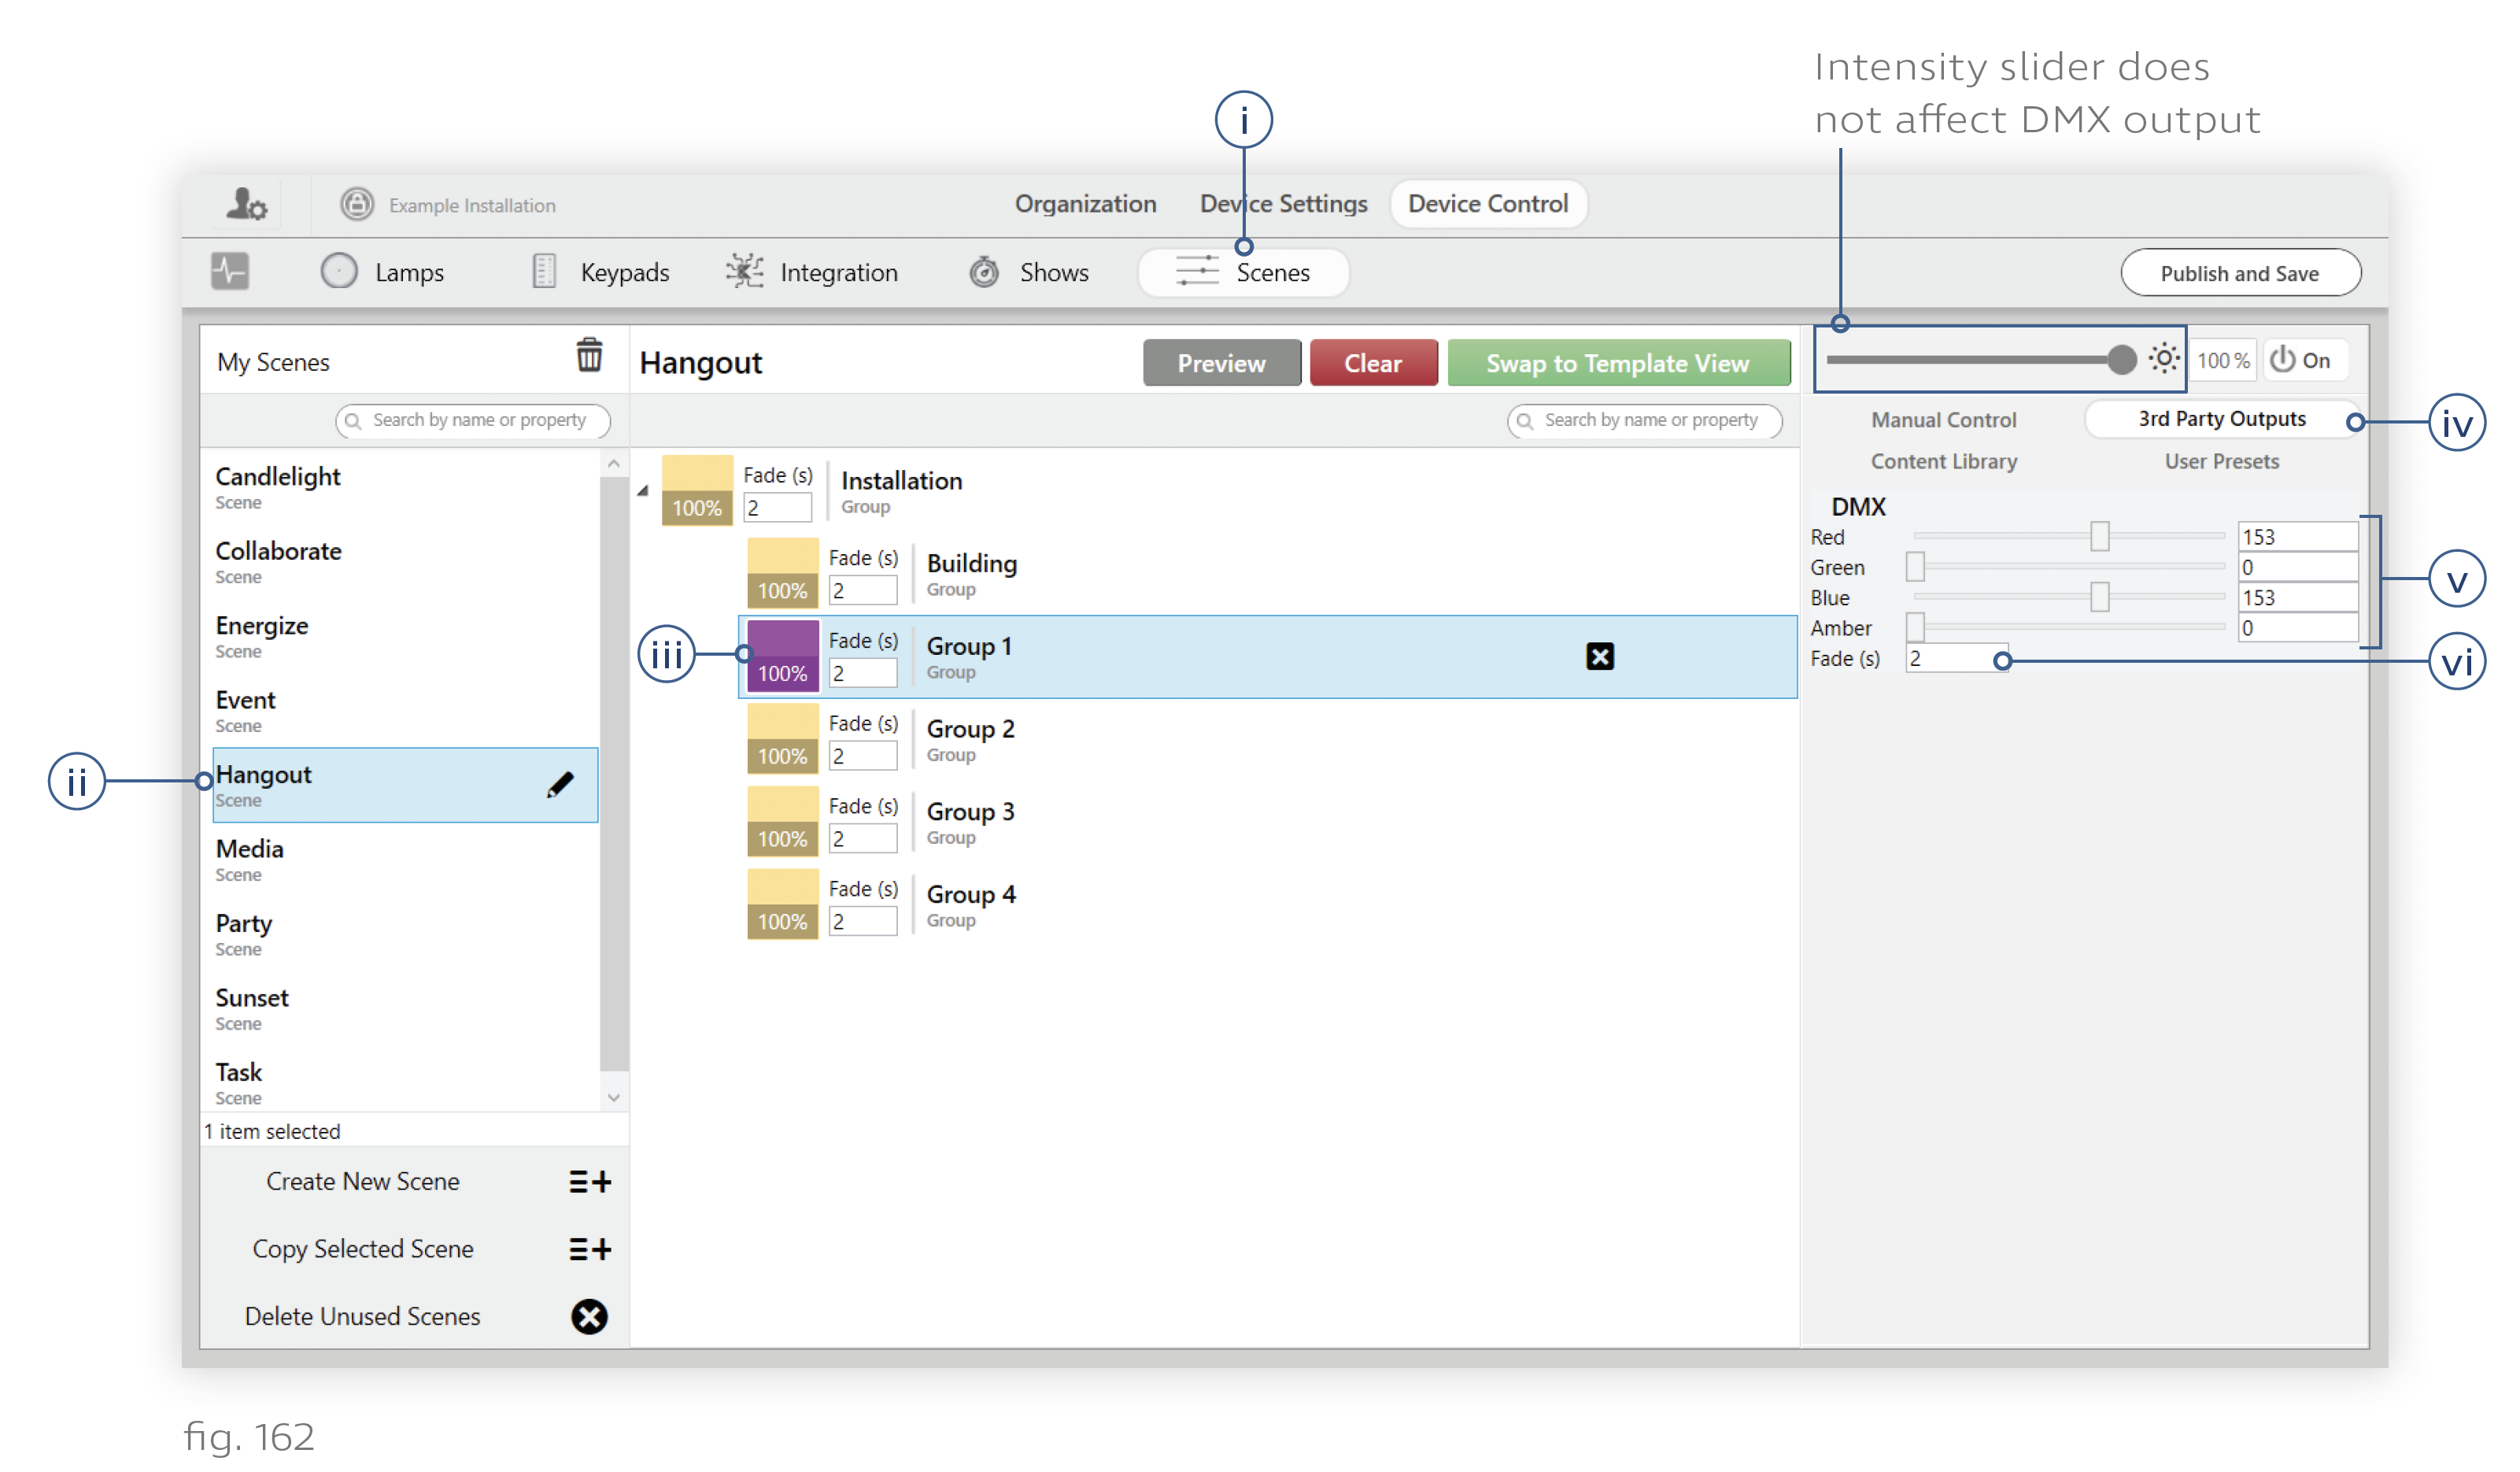
7. Customize the DMX outputs in scenes (See fig. 162).
i. Go to Device Control > Scenes.
ii. Select a scene in the My Scenes panel, or create a new one.
iii. Select a group from the scene’s grouping hierarchy that contains a DMX output profile.
Note: The group’s color and intensity settings do not apply to the DMX output, only to Ketra lights. If the group shows a color and intensity setting of blue, 50%, the DMX output will remain at its default unless you go to the 3rd Party Outputs tab as covered in step 3.4 and make changes there.
iv. In the color picker panel on the right, click the 3rd Party Outputs tab. You should see the profile’s parameters as adjustable values.
Note: If you created a new scene and the group defaulted to NA, you will need to click the + icon next to the group’s name before you can see the appropriate DMX sliders for the group.
v. Configure the information the N3 Satellite will send out on each channel when the scene is triggered. Example: In fig. 162, when a user triggers the Hangout scene, the N3 Satellite will output the values 153, 0, 153, and 0 on channels 7-10 (since Group 1 contains the output “RGBA chs. 7-10”). The receiving devices should be configured to interpret data from those channels as red, green, blue, and amber, respectively.
Note: Using the intensity slider at the top of the color picker panel will only affect the group’s Ketra lights. To control the DMX output’s intensity, use the profile’s intensity parameter or lower all of its RGB/RGBA values equally.
vi. Configure the number of seconds it will take the selected output’s corresponding receivers to transition to the scene. This is done using the "Fade" text field. Example: In fig. 162, when a user triggers the Hangout scene, the receiving devices will transition from their current state to their Hangout state over the course of 2 seconds.
vii. Repeat steps 3.iii-3.vi for any additional groups DMX outputs.
viii. In the top-right, click Publish and Save.
. Assign the scene to an input trigger. You can assign the scene to any of the following:
- A HomeWorks QS keypad button (through the HomeWorks QS software)
- A Ketra keypad button
- A contact-closure input
- A time trigger in a show